CMS (for Azure Stack Hub)
This is the operational manual for the CloudAxis CMS for Azure Stack Hub.
- Introduction
- Getting Started
- Concepts
- Operations
- Administration
- API & Automation
- How-To
- Relationship Management
- Region Management
- User Management
- Subscription Management
- System Settings
- Price Management
- Billing Management
- Container Management
- Knowledge Base
Introduction
Overview
The CMS for Azure Stack Hub is a management and billing platform for Azure Stack Hub that connects technical service delivery with commercial operations. It is designed for service providers, enterprises, and partners who need to operate Azure Stack Hub as a structured, multi-tenant cloud service.

At its core, the CMS provides a layered model that reflects how services are delivered and monetized:
-
Platform Administrators operate and configure the system. They publish pricing, manage global settings, and oversee usage processing across regions.
-
Distributors represent the top commercial tier beneath the platform. They manage multiple partners and have visibility into aggregated usage, billing, and commissions.
-
Partners act as the customer-facing organizations. They onboard tenants, manage subscriptions, and handle tenant-level billing and support.
-
Tenants are the consuming organizations. They manage their own subscriptions and users, while billing and usage flow upward to the partner and distributor.
-
Subscriptions are the unit of consumption within a tenant. They tie workloads to plans and quotas, generate usage records, and form the basis for billing and invoicing.
This hierarchy ensures that both technical and commercial responsibilities are aligned. Usage flows upward from subscriptions to tenants, partners, and distributors, while pricing, commissions, and governance flow downward from the platform.
Key capabilities include:
-
Unified Multi-Tier Management – Administrators, distributors, partners, and tenants are modeled consistently in the system.
-
Automated Billing – Usage data is collected, rated, and reconciled into invoices at the subscription and tenant level.
-
Flexible Pricing and Discounts – Flat and tiered rates, credits, and overrides can be applied at multiple scopes.
-
Commission Frameworks – Built-in logic for calculating and attributing commissions to partners and distributors.
-
API-Driven Operations – All functions are exposed through a standards-based REST API for automation and integration.
-
Branding and Delegation – Each level of the hierarchy can be branded appropriately, with role-based access control ensuring least-privilege delegation.
The CMS provides the foundation to operate Azure Stack Hub as a commercial service, supporting both external service providers and internal enterprise IT. By unifying consumption data, pricing models, billing, and commissions under a single platform, it enables organizations to deliver cloud services with transparency, accountability, and commercial accuracy.
Supported Scenarios
The CMS is designed to support a wide range of operational and business models for organizations using Azure Stack Hub. It combines a multi-tier commercial hierarchy with flexible deployment patterns, ensuring that both service providers and enterprises can align technical delivery with business outcomes.
Platform Administrators
Operate and govern the CMS at the highest level. Typical activities include publishing pricing and plans, managing usage processing, configuring branding and authentication, and ensuring compliance across regions.
Distributors
Represent the top commercial tier beneath the platform. They manage multiple partners, view aggregated billing and commission data, and apply distributor-level commission structures.
Partners
Act as the customer-facing entities for tenants. They onboard tenants, assign subscriptions, and manage billing at the tenant level. Partner-specific pricing and commission rates can be applied where required.
Tenants
Represent the consuming organizations (end customers or internal business units). Tenants manage their own subscriptions and users, while billing and usage data flow upward to their partner and distributor.
Subscriptions
Provide the unit of consumption within a tenant. Subscriptions map workloads to specific plans and quotas, generate usage records, and serve as the basis for billing and invoicing.
Industry Use Cases
-
Service Providers
Deliver Azure Stack Hub as a multi-tenant service platform. Use the CMS to onboard tenants, meter consumption, generate invoices, and ensure commissions flow accurately to partners and distributors. -
Enterprise IT
Adopt the CMS as an internal service management layer. Departments become tenants, projects or environments are modeled as subscriptions, and chargeback or showback reporting ensures cost transparency. -
Hybrid Cloud Operators
Consolidate usage across Azure Stack Hub and external cloud platforms. Apply consistent billing and governance policies across all regions, even in partially disconnected environments. -
Regulated Environments
Deploy the CMS where compliance and auditability are essential. Role-based access control (RBAC), usage records, and audit trails support regulatory frameworks.
Out of Scope
The CMS does not replace the core resource providers in Azure Stack Hub (Compute, Storage, Network) or native Azure monitoring tools. Instead, it complements them by adding commercial, operational, and governance layers on top of existing capabilities.
System Requirements
The CMS is delivered as a .NET-based application backed by a MySQL database. It is packaged for deployment in containerized or virtualized environments and can be operated either alongside Azure Stack Hub infrastructure or on external platforms.
Software Requirements
-
Database: MySQL 8.0 or later
-
Application Runtime: .NET 8
-
Frontend: Blazor Server (runs as part of the API service or in a separate container)
-
Optional Components: Docker or Kubernetes for container orchestration
Hardware Requirements
-
Production Deployment
-
Minimum 4 vCPUs
-
16 GB RAM
-
100 GB storage (expandable based on retention of usage and billing data)
-
-
Development or Evaluation Deployment
-
Minimum 2 vCPUs
-
8 GB RAM
-
50 GB storage
-
Network Requirements
-
Outbound HTTPS connectivity to Azure Stack Hub administrative endpoints
-
Inbound HTTPS (TCP 443) for API and portal access
-
Optional VPN or ExpressRoute for hybrid or private connectivity scenarios
Identity Requirements
-
Integration with Microsoft Entra ID or another supported identity provider
-
Federated authentication supported through token validation endpoints
-
Role-based access control (RBAC) enforced throughout the portal and API
High Availability and Recovery
The CMS can be deployed in a high-availability configuration using container clustering or database replication. Backup and recovery procedures should be established to protect the MySQL database and configuration state. For detailed operational guidance, see Backups & DR in the Operations chapter.
Getting Started
Installation
The CMS is deployed as a containerized service. Deployment involves preparing the database, configuring application settings, and validating connectivity to Azure Stack Hub.
Prerequisites
-
A Linux or Windows host with Docker or Kubernetes support
-
Access to a MySQL 8.0 or later database instance
-
Administrative access to Azure Stack Hub endpoints
-
A valid TLS certificate for the portal and API endpoints
Installation Steps
-
Database Setup
-
Create a dedicated MySQL database (e.g.,
cms). -
Apply the schema migrations provided with the installation package.
-
-
Application Deployment
-
Pull the container image from the registry or build it from source.
-
Run the container with environment variables specifying database connection strings, identity provider configuration, and API settings.
-
If deploying on Kubernetes, apply the provided YAML manifests to the cluster.
-
-
Initial Configuration
-
Access the CMS portal at
https://<hostname>. -
Log in with the default administrator account created during setup.
-
Update branding, system settings, and identity provider integration through the Administration menu.
-
-
Connectivity Validation
-
Confirm that the CMS can reach Azure Stack Hub endpoints.
-
Test authentication through Microsoft Entra ID or the configured identity provider.
-
Verify database connectivity and confirm that initial tenants and subscriptions can be created.
-
Post-Installation Tasks
-
Replace default credentials with secure administrator accounts.
-
Configure backup routines for the MySQL database.
-
Set up monitoring and logging integration (see Operations → Monitoring & Alerts).
First Login
Once the CMS has been deployed and initial configuration is complete, administrators and users can access the portal and API. The first login process establishes identity integration and sets the foundation for role-based access control (RBAC).
Accessing the Portal
Default Roles
The CMS uses a role-based access model to control permissions. The following roles are provided by default:
-
Platform Administrator
Full system access, including tenant onboarding, subscription management, billing, pricing, and system configuration. -
Tenant Administrator
Scoped access to manage subscriptions, resources, and users within a single tenant. -
Partner Administrator
Scoped Access to commission and billing data for a partner’s downstream tenants. - Distributor Administrator
Scoped Access to commission and billing data for a distributors' downstream partners and tenants. -
Platform User
Access to read all system data but cannot make any changes. - Tenant User
Scoped access to read subscriptions, resources, and users within a single tenant. - Partner User
Scoped Access to read commission and billing data for a partner’s downstream tenants. - Distributor User
Scoped Access to read commission and billing data for a distributors' downstream partners and tenants.
First-Time Setup
On first login, the administrator should:
-
Change the default password or confirm federated login is enforced.
-
Configure additional administrators or delegated roles.
-
Verify role mappings if using federated identity providers.
Quick Start Tutorial
Introduction
This page is intended to guide new operators through the steps required to onboard tenants.
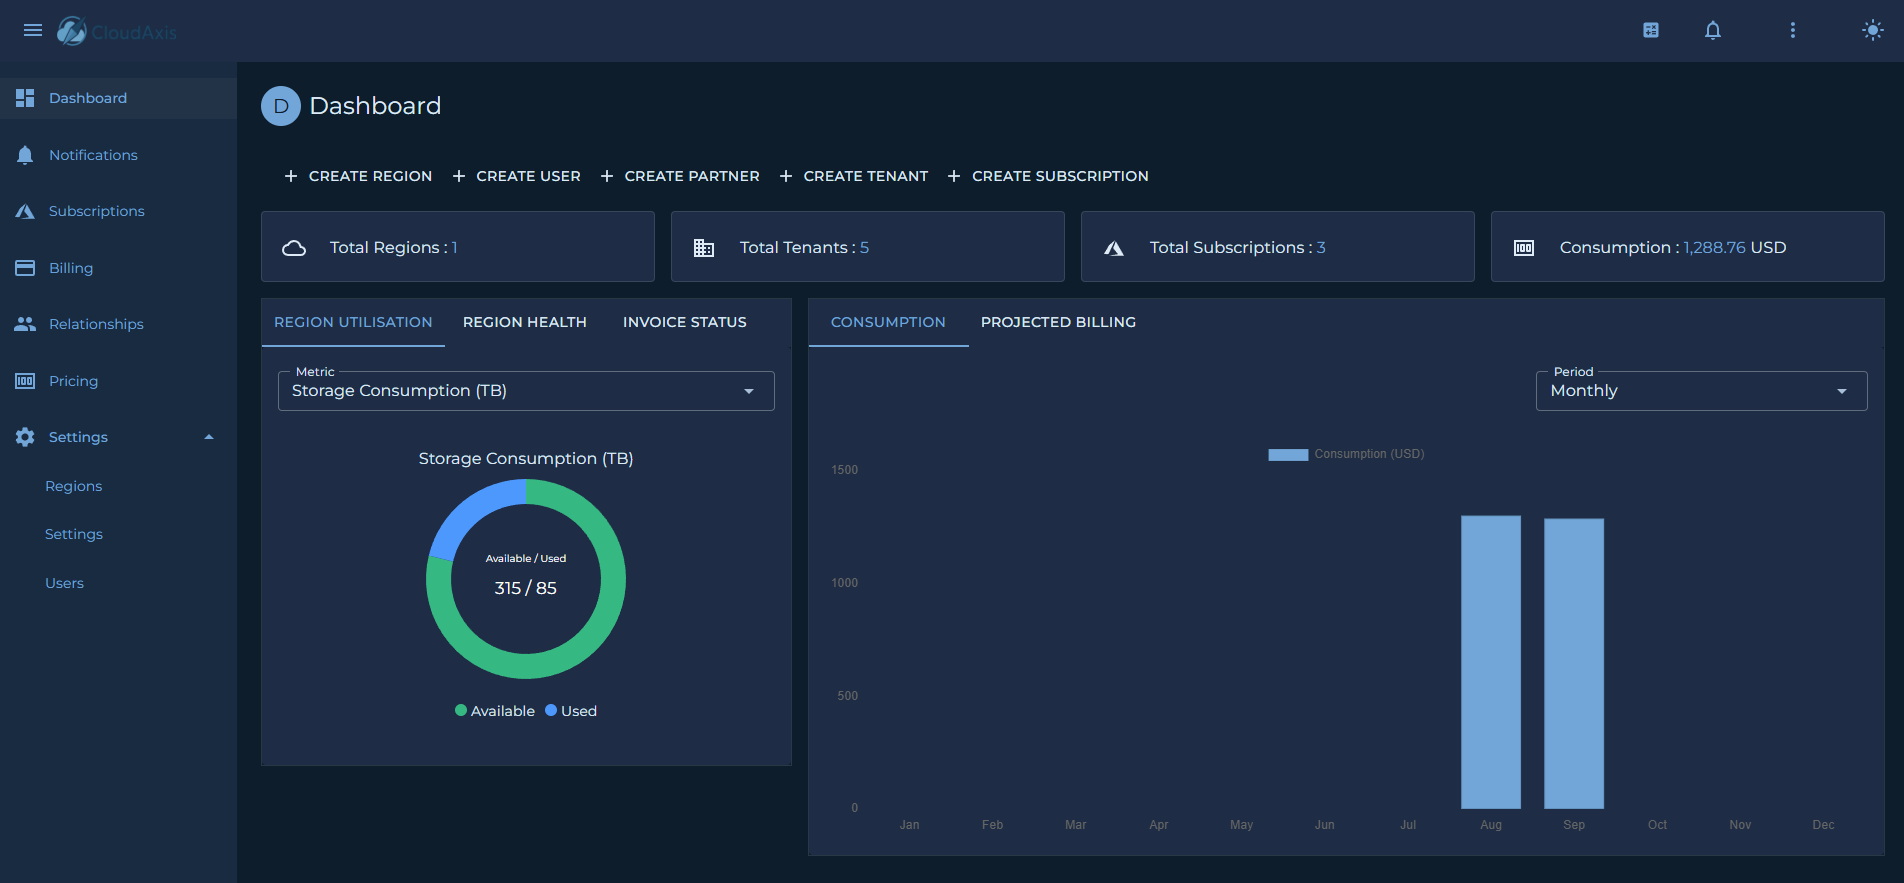
Step 1: Add a Region
| Note: Only Platform Administrators can onboard regions. |
- From the Dashboard or under Settings and Regions.
-
Select Add Region and complete the wizard to onboard a region
Step 2: Add a Distributor
| Note: Only Platform Administrators can onboard distributors. |
- Under Relationships select Distributors.
-
Select Add Distributor and complete the wizard to onboard a distributor.
Step 3: Add a Partner
| Note: Only Platform and Distributor Administrators can onboard partners. |
- Under Relationships select Partners.
-
Select Add Partner and complete the wizard to onboard a partner.
Step 4: Add a Tenant
| Note: Only Platform, Distributor and Partner Administrators can onboard tenants. |
- From the Dashboard or under Relationships and Tenants.
-
Select Add Tenant and complete the wizard to onboard a tenant.
Step 5: Create a Subscription
| Note: Any Administrator role can onboard a new subscription. |
- From the Dashboard or under Subscriptions.
- Select Add Subscription and complete the wizard to onboard a new subscription.
Step 6: Configure Users
| Note: Create and scope users accordingly noting that at each level of the model (Distributors, Partners and Tenants) can manage their respective scoped users. |
- From the Dashboard or under Settings and Users.
- Select Add User and complete the wizard to onboard a new user.
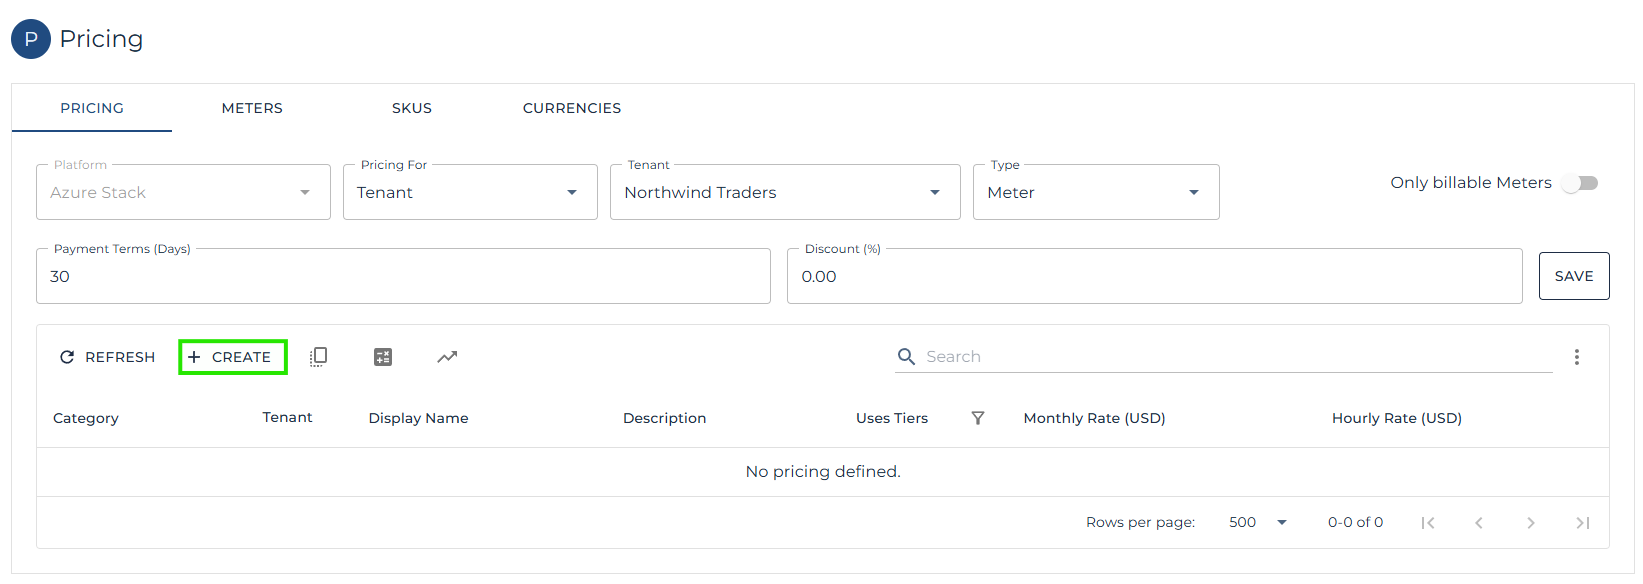
Step 7: Configure Pricing
-
Under Pricing.
-
While in the Meters or SKUs view.
-
Select Add Pricing. Configure the price lists as required.
Step 8: Generate Billing Records
Concepts
Identity and RBAC
Introduction
The CMS implements it's own authentication flows as well as leveraging federated authentication with both Microsoft and Google.
Authentication
- Supports CMS credentials and federated sign-in (e.g., Microsoft Entra).
- Tokens are validated for issuer, audience, lifetime, and signature.
- Federation settings control whether CMS login and/or Entra/Google login are allowed.
Authorization model
- Role-based access control with built-in roles aligned to the hierarchy.
- Access is scoped to the entity where the role is granted (platform, distributor, partner, tenant).
Supported Roles
- PlatformAdministrator / PlatformReader / PlatformService
- DistributorAdministrator / DistributorReader
- PartnerAdministrator / PartnerReader
- TenantAdministrator / TenantUser
Scope and inheritance
- Roles do not leap across unrelated branches. A Partner admin cannot see a Tenant owned by a different Partner.
- Platform roles supersede lower scopes for operations and support.
Audit and accountability
- All sensitive actions (pricing, commission, usage processing, role assignment) should be traceable to an authenticated identity.
- Logs and audit trails enable operational forensics and compliance reporting.
Federation controls (examples)
- Settings can enable/disable specific identity paths (e.g., allow Entra only). First
- First-login checks should enforce MFA requirements and password change where applicable.
Multi-Tenant Commercial Model
Purpose
This page explains the CMS hierarchy and how ownership, visibility, and billing flow across Distributors, Partners, Tenants, and Subscriptions. It also clarifies the role of platform administrators.
Roles in the hierarchy
- Platform Administrators: Operate and configure the system. Own global settings, branding, pricing frameworks, commission frameworks, and region/usage processing.
- Distributors: Top commercial tier beneath the platform. Own one or more partners. See aggregate usage, billing, and
- commission outcomes across their partner network.
Partners: Customer-facing organizations that onboard and manage tenants. Can inherit or define their own commission structures. - Tenants: Consuming organizations (end customers or internal business units). Own subscriptions and users.
Subscriptions: The unit of consumption and billing within a tenant. Usage, rating, and invoicing are calculated at this level.
Ownership and visibility
- Distributors can see all Partner, Tenant, and Subscription activity under their umbrella.
Partners can see their Tenants and Subscriptions.
Tenants can see only their own Subscriptions and users.
Subscriptions are strictly tenant-scoped; they never cross tenants.
All layers are visible to Platform Administrators for governance and support.
Delegation and access control
- Administration is delegated by layer. Distributors manage partners; partners manage tenants; tenants manage their own subscriptions and users.
- This reduces cross-team friction and aligns access with commercial responsibility.
Data boundaries
- Billing and usage roll up from Subscriptions to Tenants, then to Partners, and finally to Distributors.
- Commission calculation operates on these roll-ups; partner/distributor payouts are tied to actual consumption for the period.
Typical journeys
- Service-provider sales: Distributor onboards a new Partner → Partner onboards a Tenant → Platform Admin (or Partner) creates a Subscription → Tenant users begin consuming services → Usage flows to billing → Commissions are calculated and attributed upstream.
- Enterprise IT “internal reseller”: Central IT acts as Distributor; divisional IT acts as Partner; departments are Tenants; projects/business lines are Subscriptions.
Out of scope for this model
- Native Azure resource provider internals (Compute/Storage/Network specifics) are not modeled here. The CMS focuses on commercial hierarchy, delegation, usage processing, pricing, and billing.
Pricing, SKUs and Meters
Purpose
Defines how the CMS models chargeable items (SKUs), how prices are set (flat or tiered), how credits/discounts apply, and how this connects to commissions.
Core concepts
- SKU: A metered service or unit that can be priced (for example: VM vCPU-hour, managed disk GB-hour, static IP per hour).
- Price: The monetary rate attached to a SKU. Can be flat or tiered.
- Thresholds: Quantity breakpoints where a rate changes (tiered pricing).
- Adjustments: Bulk increases or decreases by percentage or absolute values, applied across selected SKUs.
- Credits and discounts: Monetary or quantity-based reductions that may apply at tenant, subscription, or resource scope.
Scoping and precedence
- Pricing selection and credits respect scope. In practice:
- Tenant-scoped pricing/credits override region defaults when configured.
- Subscription-scoped pricing/credits can further customize for a specific workload.
- Resource-level credits (when supported) apply last for fine-grained cases.
When no custom scope is present, region defaults are used.
Currency and FX
- Billing can run in a selected display currency.
- FX conversion applies at report time or during rating, depending on configuration.
- Historical FX rates should be preserved to ensure reproducibility of past invoices.
Operational guidance
- After changing prices or thresholds, re-rate affected periods or trigger targeted usage reprocessing, so billing reflects new prices where policy allows.
- Price comparison tools and cloning workflows help align price sheets across regions or offers.
Commission linkage
- Commission rates are defined at the Partner or Distributor level.
- Monthly billing aggregates by partner/distributor scope; commissions are calculated from those aggregates and stored for downstream reporting and payout.
Regions and Usage
Purpose
Explains how regions (stamps) are represented and how usage flows from collection to rating and billing, including offline scenarios.
Regions (stamps)
- A Region represents a source of usage.
- Each Region has the endpoints/credentials required for usage collection and health checks.
- Multiple Regions can be operated concurrently; billing can aggregate across regions.
- Offline and disconnected operations
- The CMS is designed to support disconnected environments.
- Usage and rating can proceed without continuous internet access when inputs are available.
Usage processing pipeline
- Collection: Pull raw usage records for a Region and time range.
- Mapping: Normalize and map records to Subscriptions and SKUs.
- Aggregation: Group by resource/meter and billing period with quantity roll-ups.
- Rating: Apply prices, thresholds, credits, and currency rules.
- Output: Persist rated usage and expose summaries for invoicing, analytics, and commissions.
Operations
Provisioning Workflows
Provisioning in the CMS follows the hierarchy of Distributor → Partner → Tenant → Subscription. Each workflow ensures that commercial alignment and technical access are established at the same time.
Adding a Distributor
-
Action: Platform Admin creates a new distributor record.
-
Inputs: Distributor name, contact details, commission framework.
-
Outputs: Distributor admin account and portal access.
Onboarding a Partner
-
Action: Distributor (or Platform Admin) creates a partner under their scope.
-
Inputs: Partner name, branding settings, commission rates if defined.
-
Outputs: Partner admin account with delegated access.
Creating a Tenant
-
Action: Partner admin creates a tenant.
-
Inputs: Tenant organization name, contact details, identity provider mapping.
-
Outputs: Tenant administrator account.
Assigning a Subscription
-
Action: Partner or tenant admin creates a subscription under a tenant.
-
Inputs: Linked plan, quotas, optional overrides (pricing/credits).
-
Outputs: Active subscription that begins generating usage.
Checklist
-
Ensure commission settings are correct before onboarding partners.
-
Confirm tenant identity settings before creating user accounts.
-
Validate subscription linkage to an active plan to avoid billing gaps.
Backups & DR
Protecting CMS data is essential for both compliance and operational recovery. The key data asset is the MySQL database, along with configuration files and TLS certificates.
Backup Strategy
-
Database: Perform regular dumps or use replication to a secondary server.
-
Configuration: Store environment variables and YAML manifests in source control.
-
Certificates: Securely archive TLS certificates and renewal processes.
Recovery Strategy
-
Point-in-Time Restore: Restore from the most recent database backup to recover billing and usage records.
-
Disaster Recovery Deployment: Deploy CMS containers to a standby cluster using restored configuration and database data.
-
Verification: Always validate recovery by logging in and confirming tenants, subscriptions, and billing summaries are intact.
Recommendations
-
Automate backups using container cron jobs or external schedulers.
-
Encrypt and test restore procedures regularly.
-
Document recovery time objectives (RTO) and recovery point objectives (RPO).
Monitoring & Alerts
The CMS provides monitoring hooks and reporting functions to ensure service continuity and compliance with billing accuracy.
Core Monitoring Areas
-
Usage Processing: Track success/failure of usage collection jobs per region.
-
Billing Runs: Monitor invoice generation status and ensure records reconcile.
-
Commission Runs: Verify commission calculation jobs complete without errors.
-
Authentication: Monitor login failures and token validation errors.
-
System Health: CPU, memory, and storage usage for container hosts.
Alerts
-
Threshold Alerts: Notify when consumption approaches plan quotas.
-
Job Failures: Notify when usage, billing, or commission jobs fail.
-
Connectivity Issues: Alerts for failed API calls to Azure Stack Hub regions.
-
License Expiry: Warning when TLS or license certificates near expiration.
Integrations
-
Alerts can be forwarded to external systems such as Splunk, Rapid7, or Azure Monitor.
-
APIs expose health endpoints for custom monitoring integrations.
Tenant Onboarding
Introduction
This page is intended to give extended clarity regarding new Tenant onboarding within the CMS.
This process assumes the following activities have already occurred:
- Regions have been added and tested.
- Distributors and Partners have been added and tested.
- Pricing has been established for the Region.
| Note: The steps below can be easily incorporated into an API driven workflow for CMS operators who already have a pre-existing customer front end. The API is described here. |
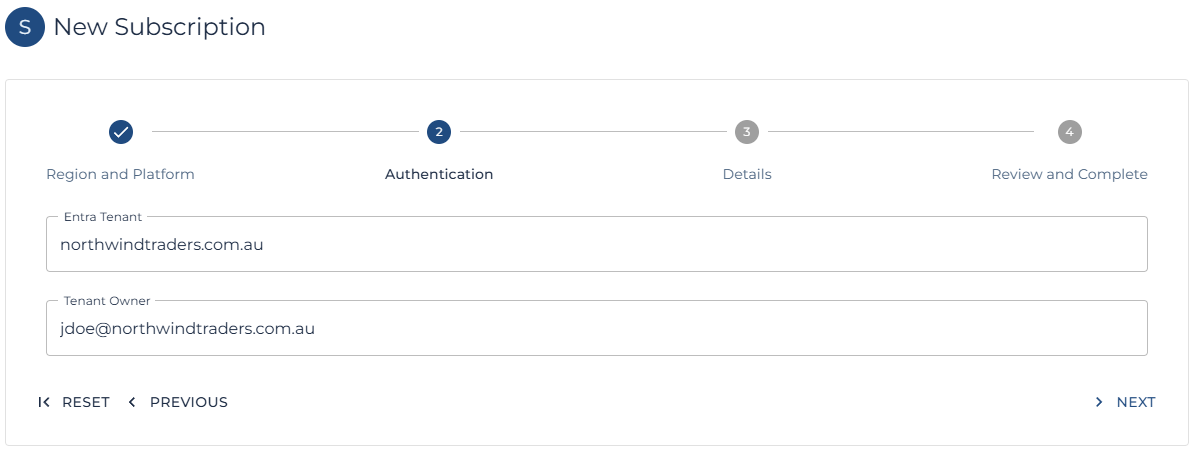
Prerequisite Information
The table below attempts to help service providers with forward planning ahead of onboarding a new tenant.
| Prerequisite | Question to Ask | Sample Answer |
| Entra Tenant for Azure Stack and CMS Authentication. | Provide the Microsoft Entra Tenant you wish to use for Authentication to the Azure Stack? | nwtraders.onmicrosoft.com |
| Entra User to be the default / initial owner of the Azure Stack Subscription / CMS Tenant. |
Provide the Entra user who will be the initial owner of the Azure Stack subscription?
This can be any user or guest user within the Entra Tenant? |
jdoe@northwindtraders.com.au |
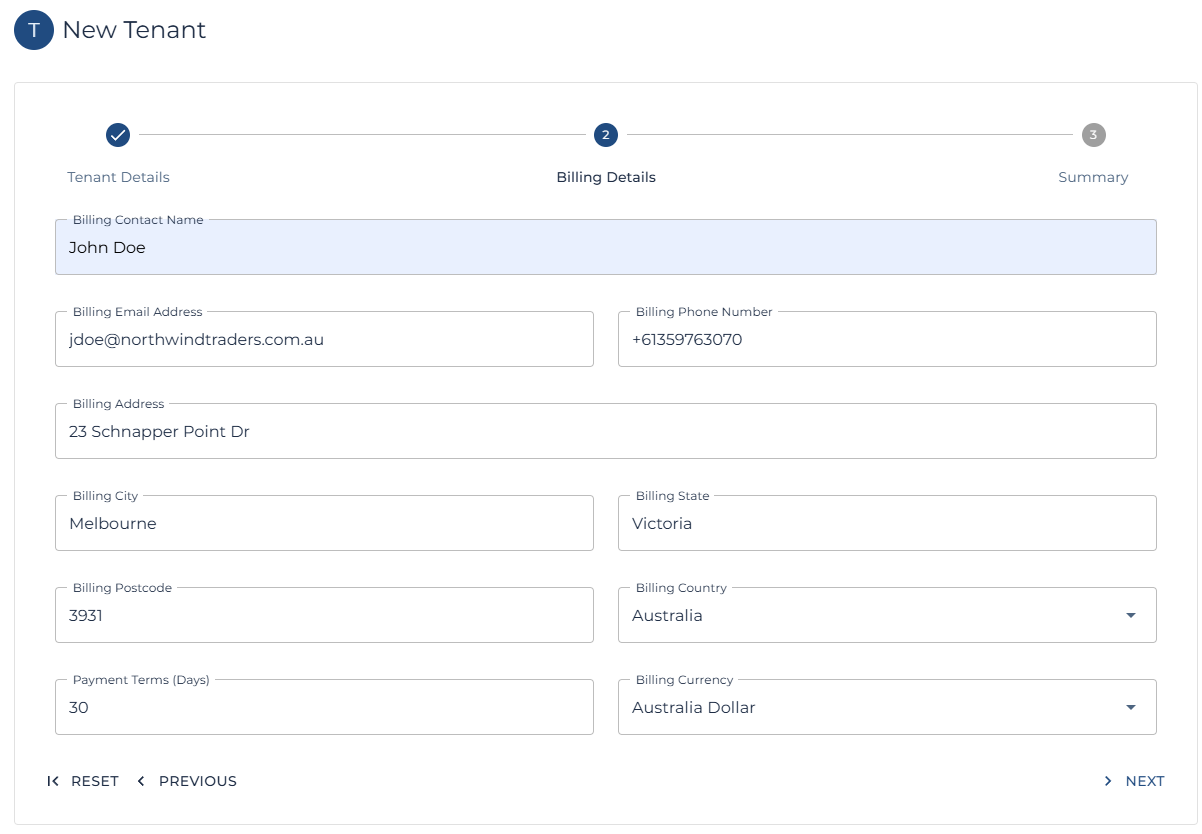
| Billing Information (Tenant) |
Provide the following Billing Contact information:
|
John Doe jdoe@northwindtraders.com.au +61359763070 3 Schnapper Point Dr Melbourne Victoria Australia
|
| Billing Information (Internal) |
If using the CMS for month end billing.
|
30 Days Australian Dollar |
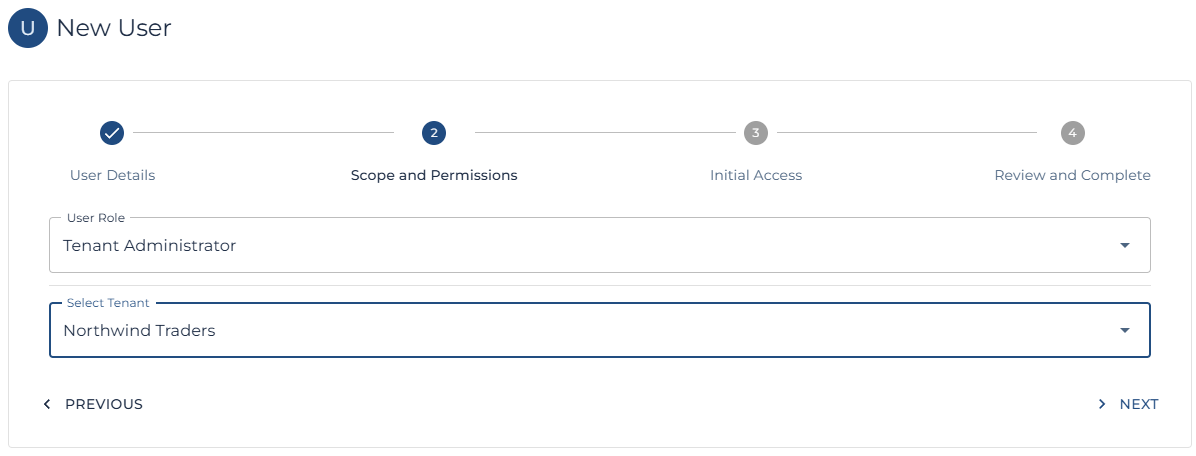
Create a new Tenant
The first step involves create a new Tenant within the CMS.
| Note: This links the Tenant to a Partner. |
| Note: Follow the steps here to create a new Tenant. |
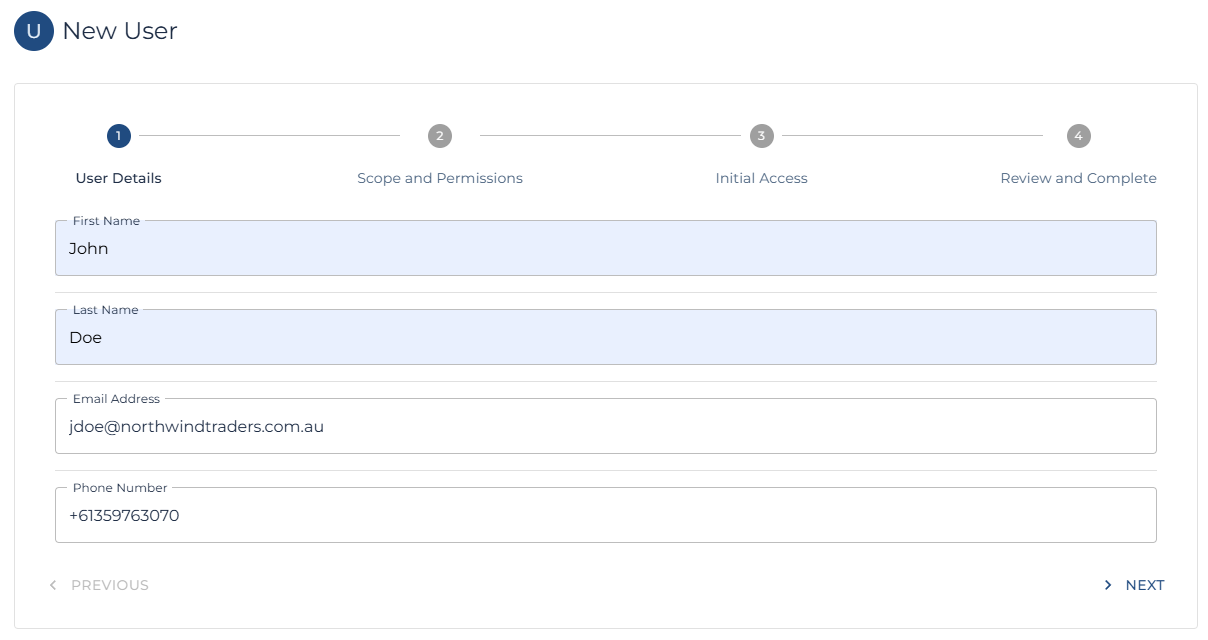
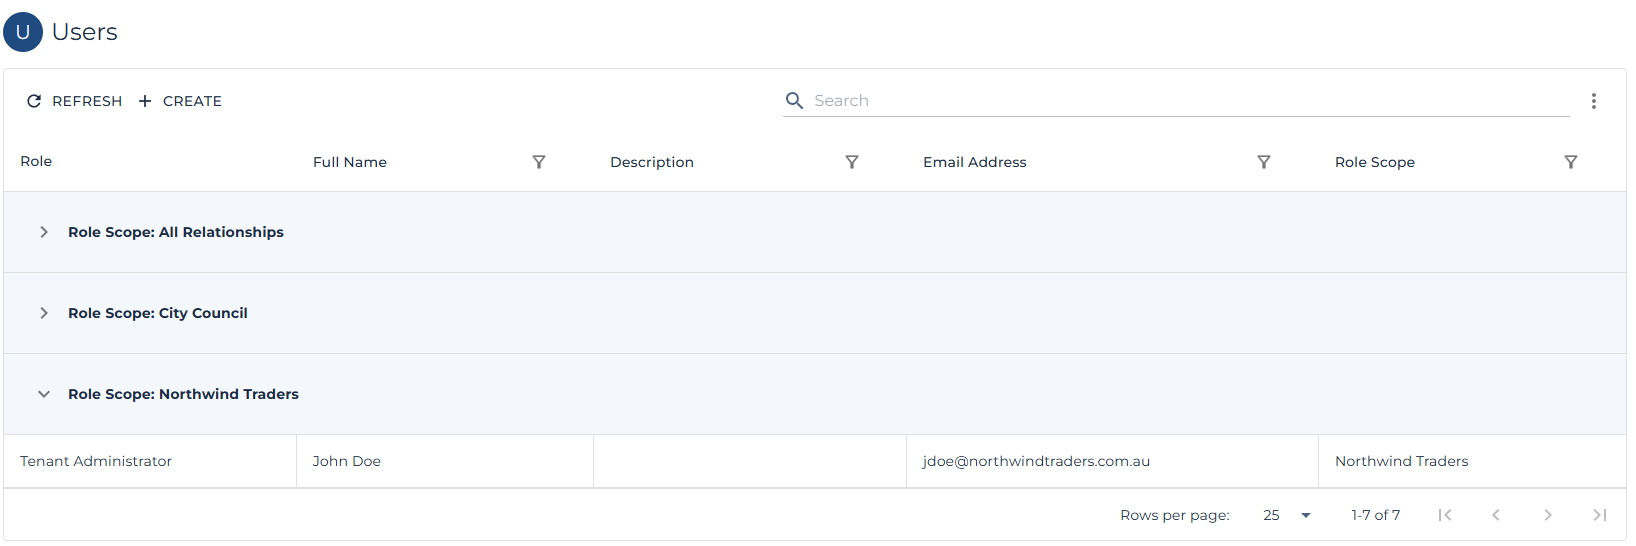
Setup Users for the New Tenant
One the Tenant has been created; the next step is to create at least one Tenant Administrators.
| Note: Tenant Administrators can then create and manage additional users and Administrators within the Tenant. |
| Note: Follow the steps here to create a new User |
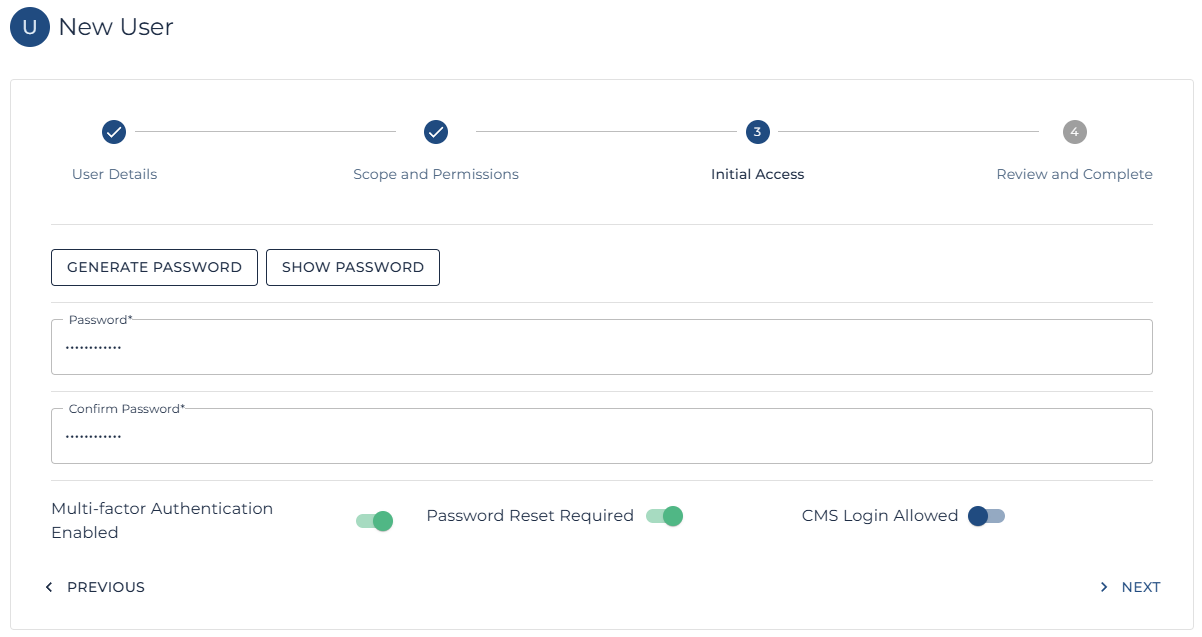
|
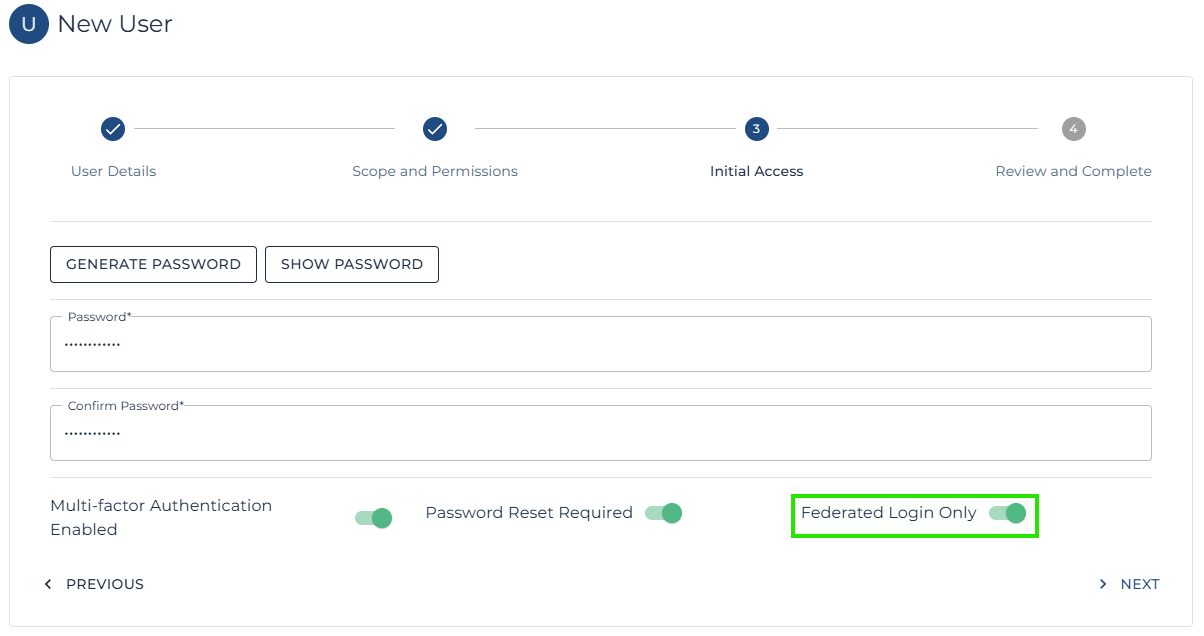
Note: One option of interest is the CMS Login Allowed. This can be switched to Federated Only, ensuring the user cannot login using the CMS authentication flow and making the tenants Entra or Google authentication system responsible.
In most cases, as the Azure Stack requires an Entra tenant in order to authenticate with the Azure Stack anyway, it is far easier to simply set CMS login Allowed to Federated Login Only as shown below.
Again, this simply blocks the user from attempting CMS authentication and delegates the Auth responsibility to the tenants Entra authority. |
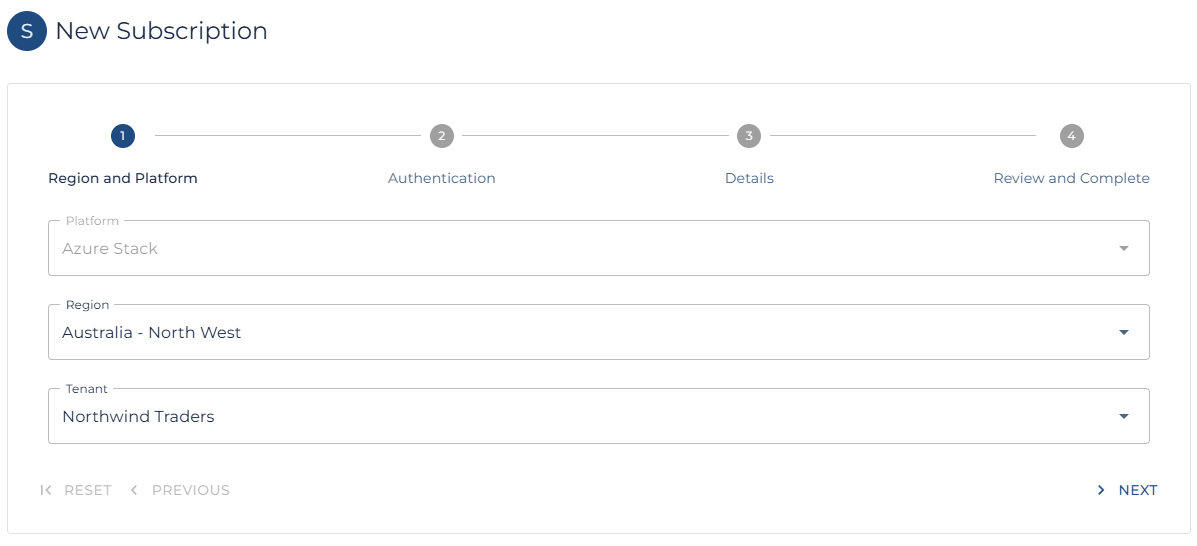
Create a new Subscription
Now that at least one user has been granted access to the CMS tenant, the first subscription can be created by a Platform Administrator, the Distributor who manages the Partner, the Partner who manages the Tenant or the Tenant themselves.
| Note: Follow these steps to create a new subscription. |
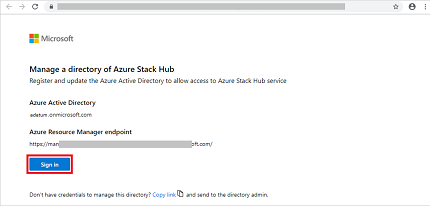
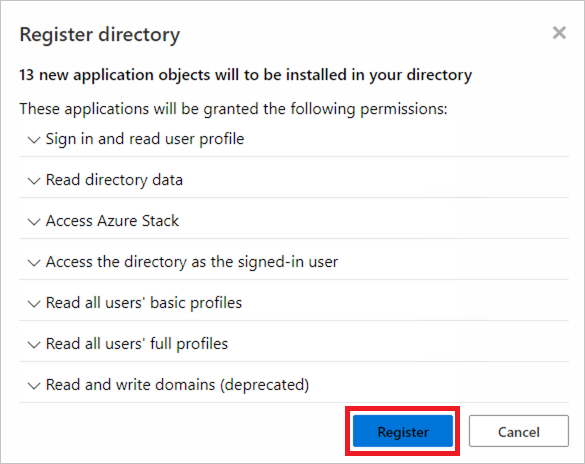
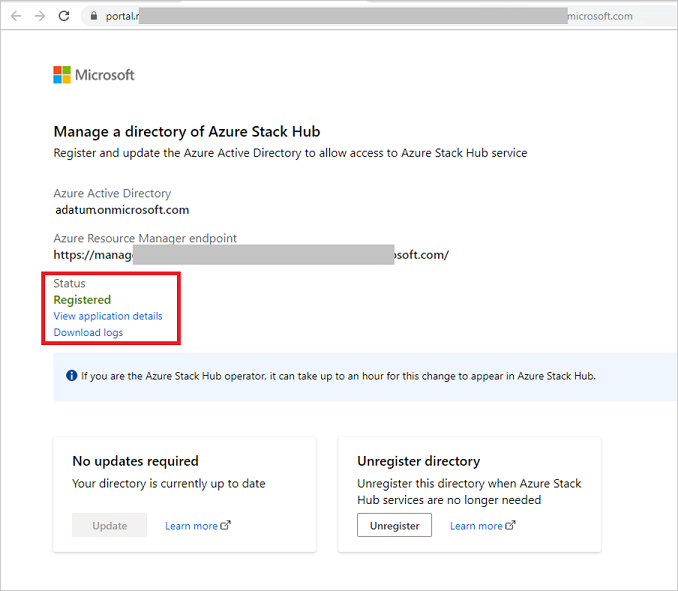
Register the Entra Tenant with the Azure Stack
| Note: This operation is managed through the Azure Stack itself and requires the tenant to complete the process, the tenant must use an Entra user with permission to register Entra Applications. Such as a Global Administrator. |
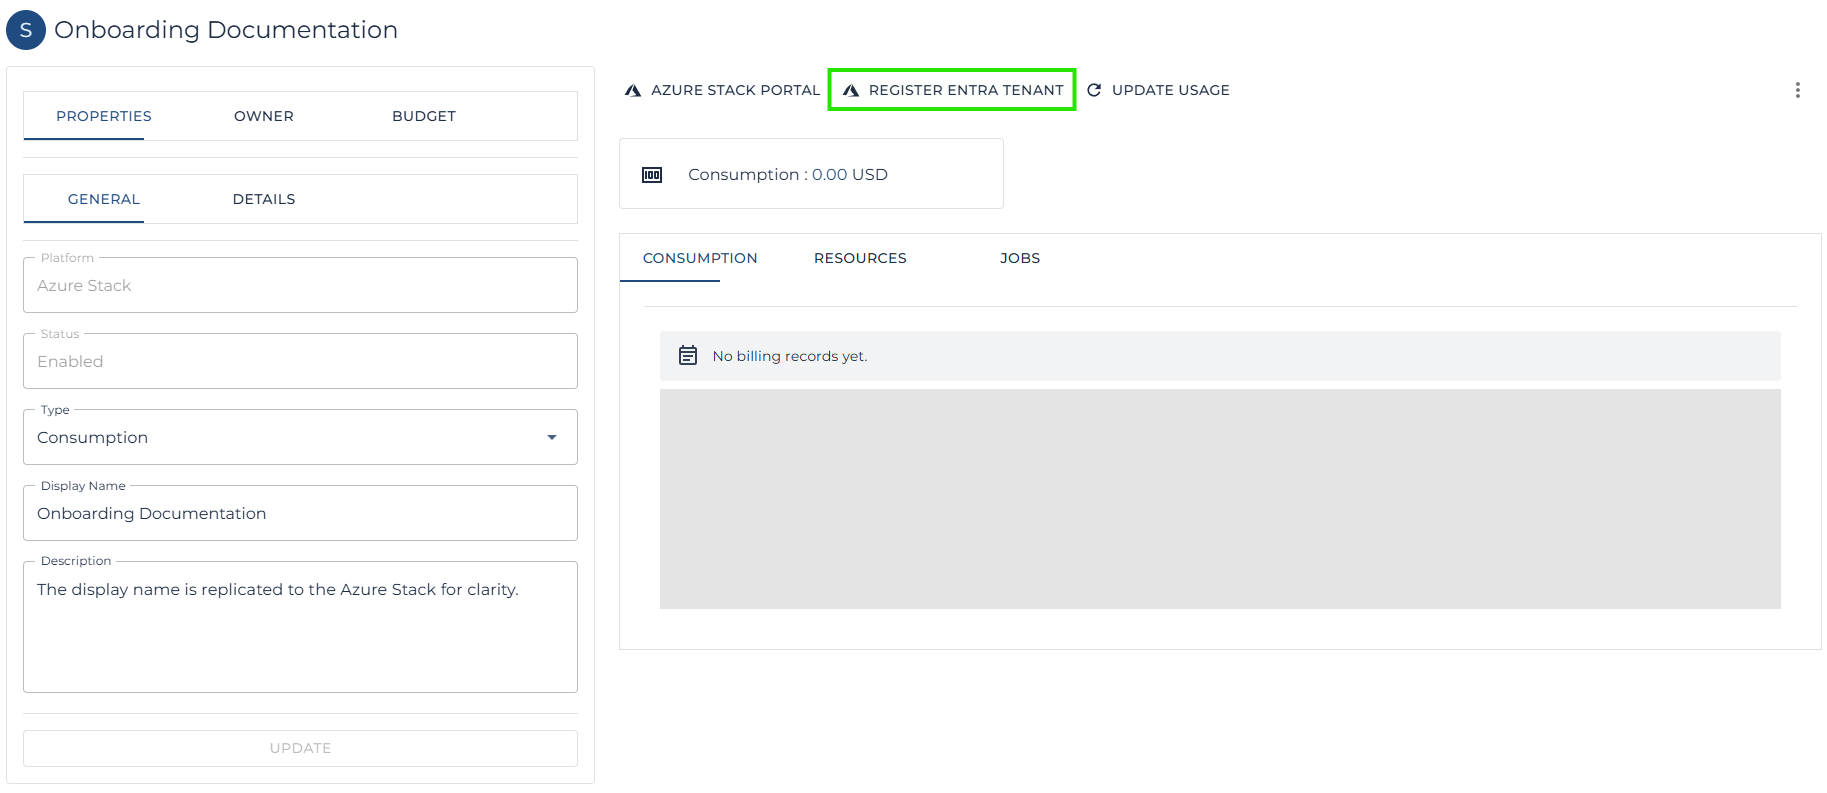
| Note: The steps to complete the Azure Stack Entra Tenant registration can be found on the Microsoft website here. |
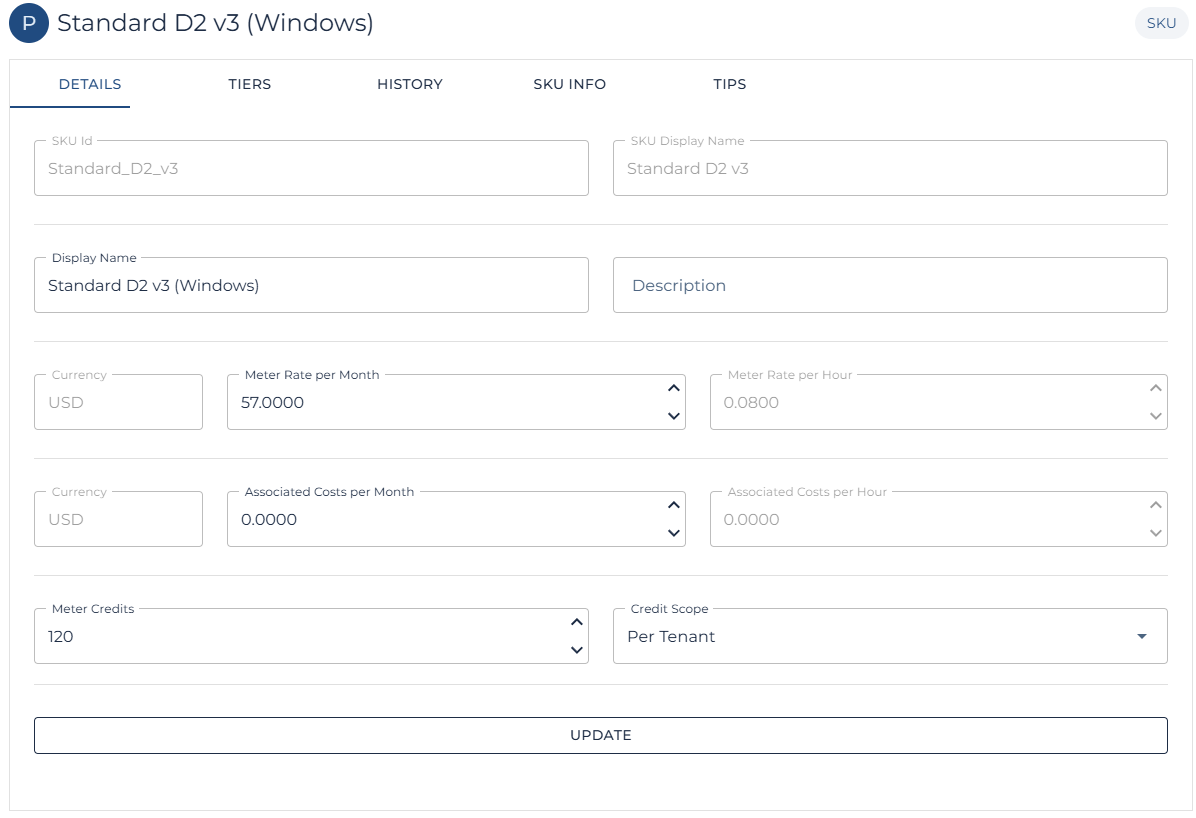
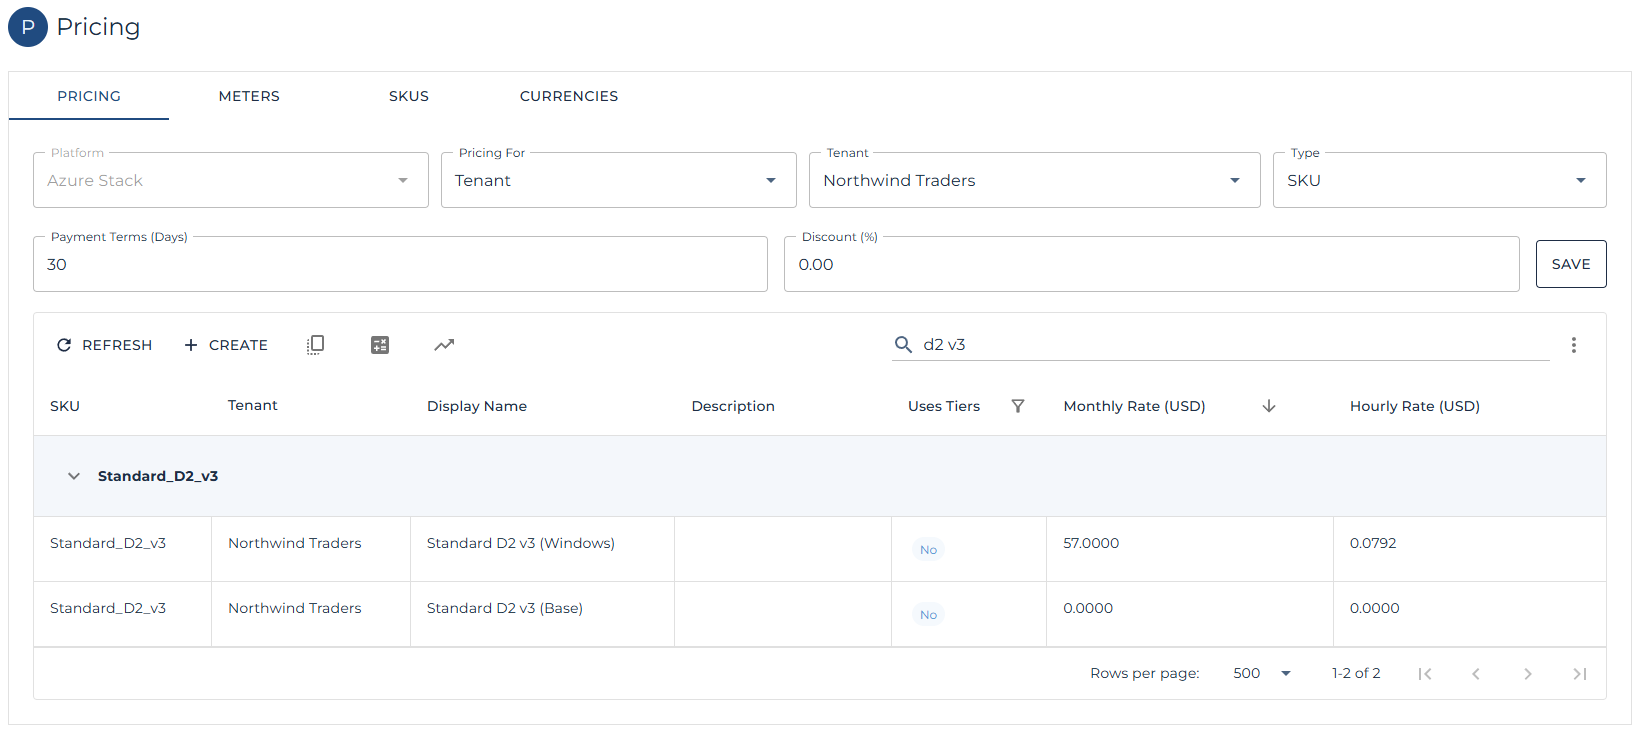
Create bespoke Pricing
Some opportunities may have been sold to tenants with custom pricing or with credits which need to be applied each month. The section below continues the flow by showing custom pricing and credits being applied to specific Azure Stack VM SKUs.
| Note: This is an optional step and only required if the tenant requires bespoke pricing or credits. |
| Note: Follow these steps to create a new price list. |
| Note: The tenant specific price list will apply during the next usage collection run or can be updated on demand in the pricing page using the recalculate button. |
Administration
Branding & Settings
The CMS is designed to be white-label and flexible. Platform administrators can adjust branding and system settings to align with the service provider or enterprise identity.
Branding Options
-
Logos: Upload light and dark mode variants.
-
Colors & Themes: Adjust portal colors, typography, and layout to match brand guidelines.
-
Naming: Override display names (e.g., “Tenant” → “Department”) for internal deployments.
-
Custom Domains: Bind branded domain names (e.g., portal.<org>.cloud).
System Settings
-
Identity: Configure authentication providers (Entra, Google, local accounts).
-
Currencies: Define default billing currency and FX handling.
-
Notifications: Configure SMTP settings for system-generated emails (billing, alerts, password resets).
-
Licensing: Apply CMS license keys or renewals.
Upgrades & Maintenance
The CMS is delivered as containerized services. Maintenance focuses on applying updates, securing the environment, and ensuring continuous availability.
Upgrades
-
Container Images: Pull updated images from the registry.
-
Rolling Updates: Apply updates one container at a time to avoid downtime.
-
Schema Migrations: Apply database migrations as part of the upgrade process.
Maintenance Tasks
-
Database Maintenance: Regularly optimize and purge old usage records as per retention policy.
-
Certificate Renewal: Update TLS certificates before expiry.
-
License Management: Validate CMS license validity and renew as required.
Recommendations
-
Maintain separate test/staging environments for validating upgrades.
-
Schedule maintenance windows for major version changes.
-
Monitor system health post-upgrade to confirm normal operations.
Troubleshooting
When issues occur, the CMS provides multiple layers of diagnostic tools. Effective troubleshooting combines log analysis, API checks, and data validation.
Common Issues
-
Login Failures: Often linked to misconfigured identity providers or expired federation tokens.
-
Usage Not Processing: Check region connectivity and raw usage ingestion jobs.
-
Billing Errors: Confirm pricing tables are consistent and schema migrations are complete.
-
Commission Mismatches: Verify commission rates are scoped correctly (partner vs distributor).
Tools & Techniques
-
Logs: Inspect application logs for API errors and job failures.
-
API Checks: Use Swagger endpoints to verify health and validate query results.
-
Database Queries: Run direct MySQL queries to confirm data integrity in billing or usage tables.
-
Health Dashboards: Review monitoring metrics for system load and resource exhaustion.
Escalation
-
Gather logs, failing API calls, and reproduction steps.
-
Engage platform vendor support with diagnostic bundles.
-
Document resolution in the internal knowledge base for future reference.
API & Automation
REST API Overview
The CMS exposes a REST API that mirrors all major platform functions, allowing administrators, partners, and developers to automate operations.
API Design Principles
-
Standards-Based: JSON over HTTPS, aligned with REST conventions.
-
Role-Aware: All calls are scoped to the authenticated user’s role (Platform, Distributor, Partner, Tenant).
-
Secure by Default: Requires bearer tokens obtained through login or federation flows.
-
Consistent Resources: Entities in the API (Distributors, Partners, Tenants, Subscriptions, Usage, Billing, Commissions) align directly with portal objects.
Authentication
-
Login Flow: Obtain a token via the
/api/v1/auth/loginendpoint. -
Federated Tokens: Forward Microsoft Entra or Google tokens for verification at
/api/v1/auth/federated. -
Token Lifetime: Tokens are time-bound; refresh before expiry to avoid failures.
Core Endpoints
-
Distributors & Partners
-
/api/v1/distributors– create, list, and manage distributors -
/api/v1/partners– create, list, and manage partners
-
-
Tenants & Subscriptions
-
/api/v1/tenants– onboard tenants, assign admins -
/api/v1/subscriptions– create and manage subscriptions
-
-
Plans & Pricing
-
/api/v1/plans– publish and update plans -
/api/v1/pricing– define SKUs, rates, and thresholds
-
-
Usage & Billing
-
/api/v1/usage– ingest usage data -
/api/v1/billing/summary– generate subscription and tenant billing summaries
-
-
Commissions
-
/api/v1/commissions/summary– calculate and retrieve commissions for partners and distributors
-
-
System & Identity
-
/api/v1/settings– update branding, licensing, and identity configs -
/api/v1/roles– assign or update user roles
-
Typical Automation Scenarios
-
Tenant Onboarding
Automate tenant creation, subscription assignment, and role setup via API. -
Usage Ingestion
Post usage records into/api/v1/usageon a scheduled job (e.g., nightly processing per region). -
Billing Automation
Trigger invoice generation and retrieve billing summaries at end-of-month. -
Commission Reconciliation
Automate pulling/commissions/summaryfor financial reporting and payouts. -
Integration with External Systems
-
Connect billing output to finance/ERP systems.
-
Forward alerts or health checks to monitoring solutions.
-
Sync user identity with corporate directories.
-
Developer Notes
-
Full Swagger documentation is bundled with the CMS at
/swagger. -
API clients can be generated automatically from the provided
swagger.json. -
Rate limits apply to protect system performance; batch operations where possible.
API Examples
PowerShell
Below is an example of how to authenticate and work with the CMS Api.
Note: Make sure the user you are using is permitted to perform CMS Authentication.
########################################################################
# Variables
########################################################################
# Modify for your endpoint
$BaseUrl     = 'https://api.cloudaxis.cloud/api/v1/'
# This user is permitted to do CMS Auth
$EmailAddress = 'sample@api.connection'
$Password     = 'D!dYouRe@llyTh1nkItW0uldB3Th4t3@sy'
########################################################################
# Functions
########################################################################
# Get a Token
function Get-CmsBearerToken
{
    [CmdletBinding(DefaultParameterSetName="Initial")]
    param([Parameter(Mandatory=$true, ParameterSetName="Initial")]
          [string]$EmailAddress,
          [Parameter(Mandatory=$true, ParameterSetName="Initial")]
          [string]$Password,
          [Parameter(Mandatory=$true, ParameterSetName="Refresh")]
          [string]$RefreshToken,
          [Parameter(Mandatory=$true)]
          [string]$BaseUrl)
    end
    {
        New-CmsLogMessage -T Info "Retrieving $($PSCmdlet.ParameterSetName) CMS bearer token."

        switch ($PSCmdlet.ParameterSetName)
        {
            'Initial' {
                $Url = "$($BaseUrl.Trim('/'))/auth/token"
                $Body = @{
                    EmailAddress = $EmailAddress
                    Password = $Password
                } | ConvertTo-Json
            }
            'Refresh' {
                $Url = "$($BaseUrl.Trim('/'))/auth/token-refresh"
                $Body = @{
                    RefreshToken = $RefreshToken
                } | ConvertTo-Json
            }
        }

        $Headers = New-Object "System.Collections.Generic.Dictionary[[String],[String]]"
        $Headers.Add("Content-Type", "application/json")

        try {
            $Response = Invoke-RestMethod $Url -Method 'POST' -Headers $Headers -Body $Body
        } catch {
            New-CmsLogMessage -T Error "Token request failed. $($_.Exception.Message)"
            throw
        }
        return [CMS.Domain.Models.AuthResponse]$Response
    }
}
########################################################################
function New-CmsApiCall
{
    param([Parameter(Mandatory=$true)]
          [string]$BearerToken,
          [Parameter(Mandatory=$true)]
          [string]$BaseUrl,
          [Parameter(Mandatory=$true)]
          [string]$Uri,
          [psobject]$Body,
          [Parameter(Mandatory=$true)]
          [ValidateSet("GET", "POST", "PUT", "DELETE")]
          [string]$Method,
          [bool]$ExpectNotFound=$false)
    end
    {
        $Url = ("$($BaseUrl.Trim('/'))/$($Uri.TrimStart('/'))").ToLower()
        New-CmsLogMessage -T Info "Processing Api call - $($Method) $($Url)."

        switch ($Method)
        {
            'PUT' {
                if ($null -eq $Body) {
                    New-CmsLogMessage -T Error "Api call using $($Method) cannot have an empty Body parameter."
                } else {
                    $Body = $Body | ConvertTo-Json
                }
            }
            'POST' {
                if ($null -eq $Body) {
                    New-CmsLogMessage -T Error "Api call using $($Method) cannot have an empty Body parameter."
                } else {
                    $Body = $Body | ConvertTo-Json
                }
            }
        }

        $Headers = New-Object "System.Collections.Generic.Dictionary[[String],[String]]"
        $Headers.Add("Authorization", "Bearer $($BearerToken)")
        $Headers.Add("Content-Type", "application/json")

        try {
            $Response = Invoke-RestMethod $Url -Method $Method -Headers $Headers -Body $Body
            return $Response
        } catch {
            if (!$ExpectNotFound) {
                New-CmsLogMessage -T Error "Api call failed. $($_.Exception.Message)"
                return $Response
            }
        }
    }
}
########################################################################
# Make Calls
########################################################################
# Get Token for the Api
$Token = Get-CmsBearerToken -EmailAddress $EmailAddress -Password $Password -BaseUrl $ApiEndpoint
if (!$Token) {
    Write-Host "No token could be retrieved.";
    exit 1
}
# Get Subscriptions
$ApiResponse = New-CmsApiCall -BearerToken $Token.Token -BaseUrl $ApiEndpoint -Uri "/subscriptions/" -Method GET
if ($ApiResponse.Code -ne 200) {
    Write-Host "Error retrieving subscriptions $($ApiResponse.Errors).";
    exit 1
} else {
    Write-Verbose "Loaded Subscripions."
    $Subscriptions = $ApiResponse.Data
}
How-To
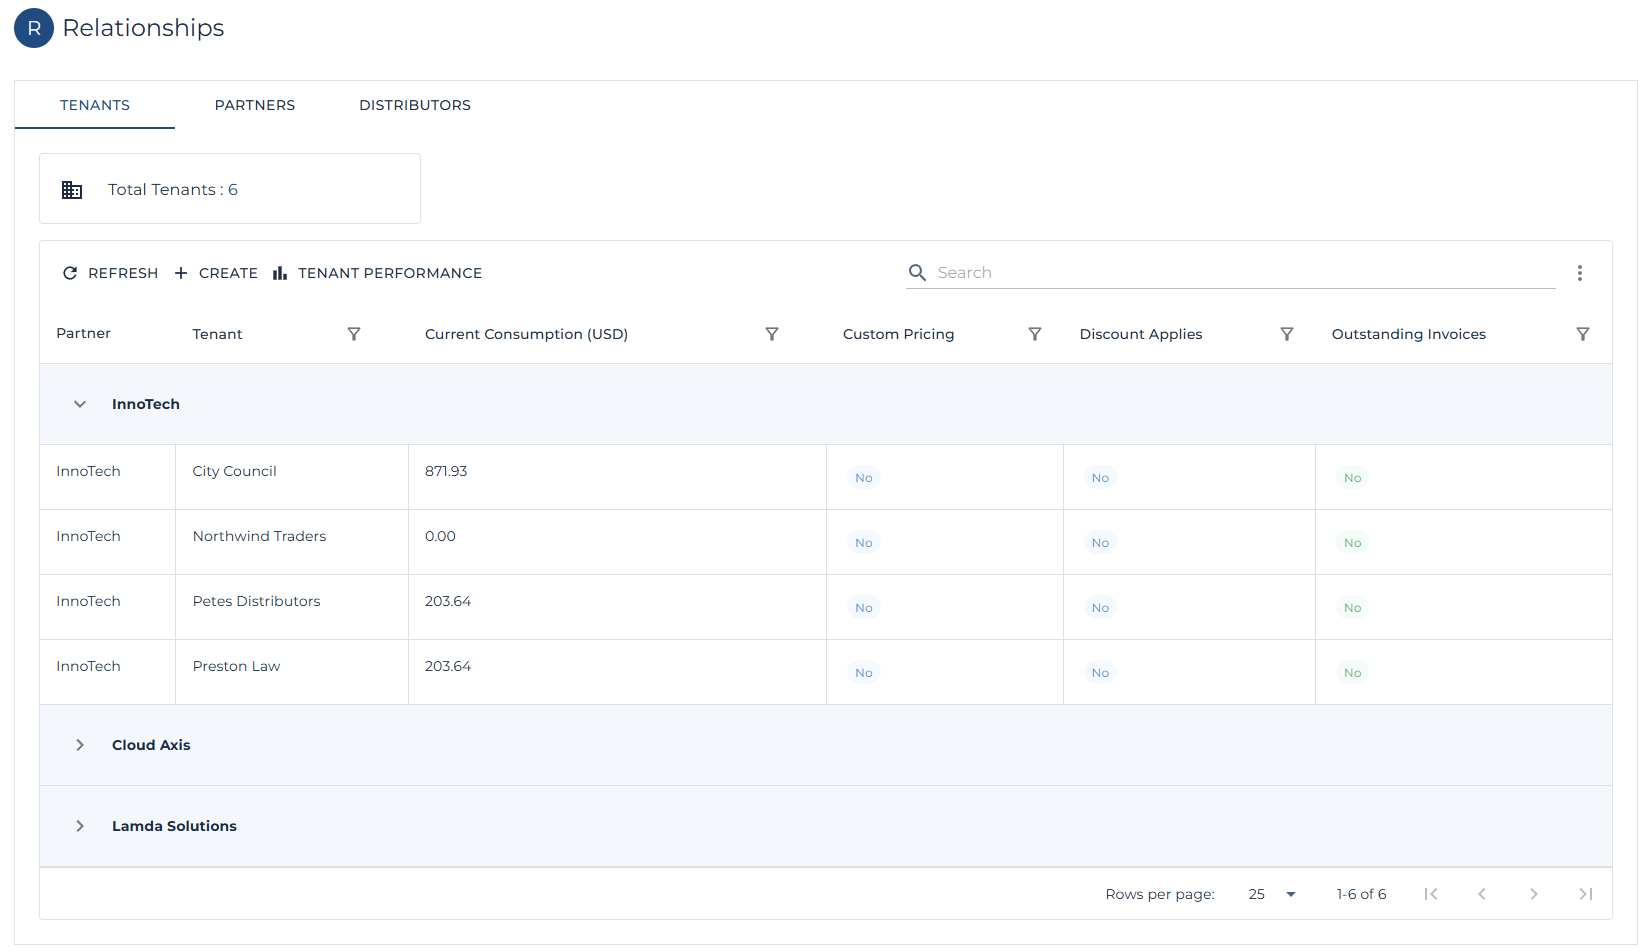
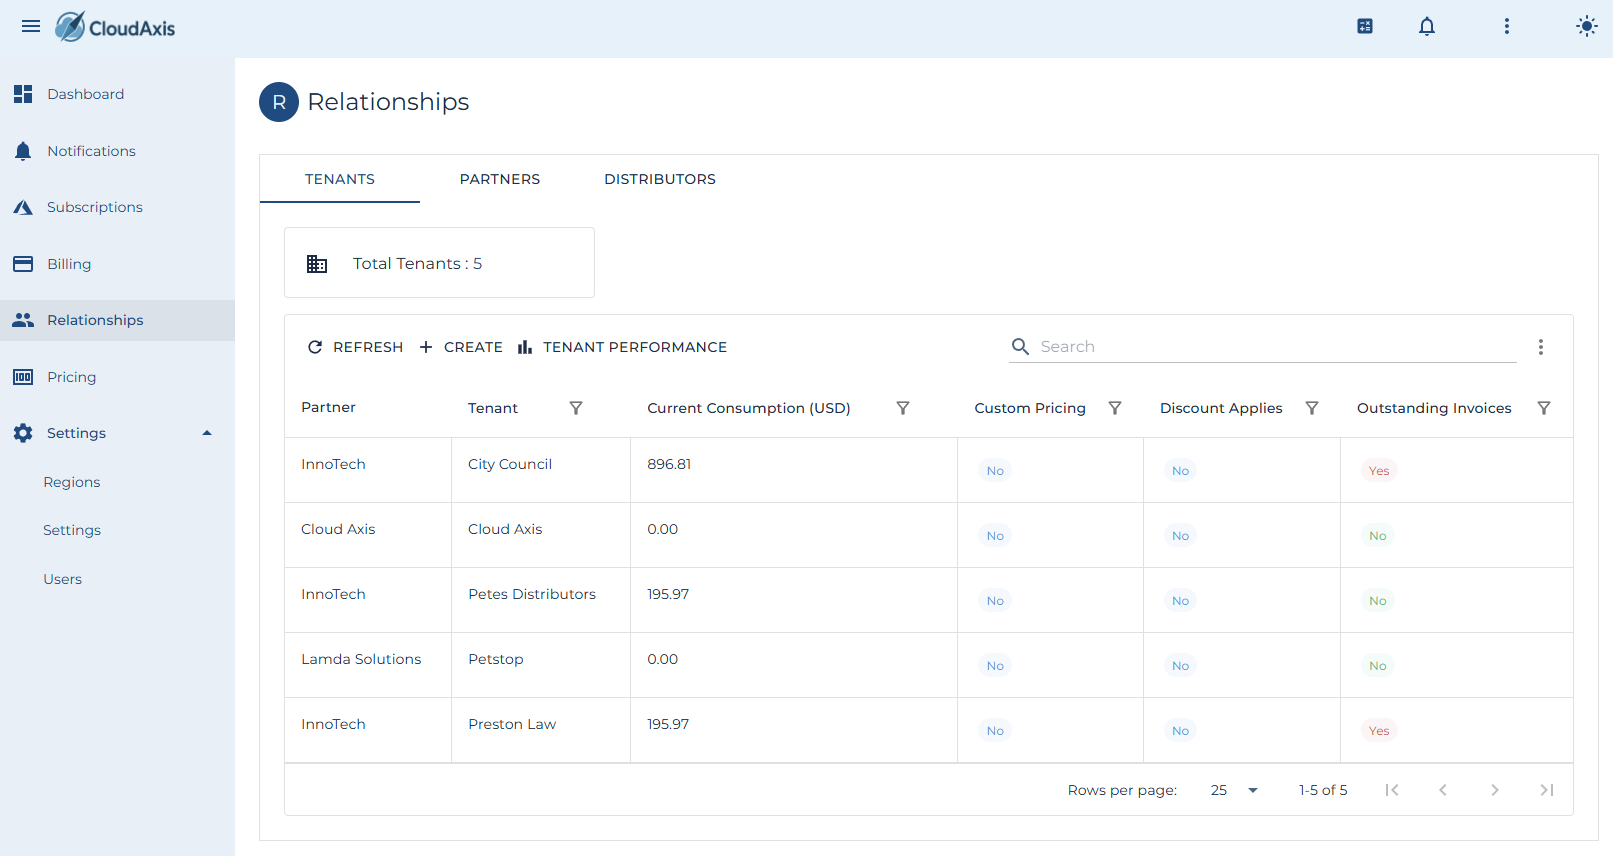
Relationship Management
Introduction
Relationship management is a critical part of administering the system.
Add a Distributor
Purpose
Register a new distributor as the top-level commercial entity under the platform.
Permission Level
Platform Administrator
Steps
-
Go to Relationships→ Distributors.
-
Select Create.
-
Enter Distributor Name and details.
-
Assign a Distributor Administrator user.
-
Select Save.
Edit a Distributor
Purpose
Update distributor details or administrators.
Permission Level
Platform Administrator
Steps
-
Go to Relationships → Distributors.
-
Select the distributor you want to edit.
-
Update Name, contact information, or administrator assignments.
-
Select Save.
Delete a Distributor
Purpose
Remove a distributor permanently.
Permission Level
Platform Administrator
Steps
-
Go to Relationships → Distributors.
-
Select the distributor you want to delete.
-
Select Delete.
-
Confirm deletion.
Add a Partner
Purpose
Register a new partner under a distributor.
Permission Level
Distributor Administrator
Platform Administrator
Steps
-
Go to Relationships → Partners.
-
Select Create.
-
Enter Partner Name and details.
-
Assign Partner Administrator(s).
-
Select the Distributor this partner belongs to.
-
Select Save.
Edit a Partner
Purpose
Update partner details or administrator assignments.
Permission Level
Distributor Administrator
Platform Administrator
Steps
-
Go to Relationships → Partners.
-
Select the partner you want to edit.
-
Update details or administrators.
-
Select Save.
Delete a Partner
Purpose
Remove a partner permanently.
Permission Level
Distributor Administrator
Platform Administrator
Steps
-
Go to Relationships → Partners.
-
Select the partner you want to delete.
-
Select Delete.
-
Confirm deletion.
Add a Tenant
Purpose
Onboard a consuming organization under a partner.
Permission Level
Partner Administrator
Distributor Administrator
Platform Administrator
Steps
-
Go to Relationships → Tenants.
-
Select Create.
-
Enter Tenant Name and details.
-
Assign Tenant Administrator(s).
-
Select the Partner this tenant belongs to.
-
Select Save.
Edit a Tenant
Purpose
Update tenant details or administrators.
Permission Level
Partner Administrator
Distributor Administrator
Platform Administrator
Steps
-
Go to Relationships → Tenants.
-
Select the tenant you want to edit.
-
Update details or administrators.
-
Select Save.
Delete a Tenant
Purpose
Remove a tenant permanently.
Permission Level
Partner Administrator
Distributor Administrator
Platform Administrator
Steps
-
Go to Relationships → Tenants.
-
Select the tenant you want to delete.
-
Select Delete.
-
Confirm deletion.
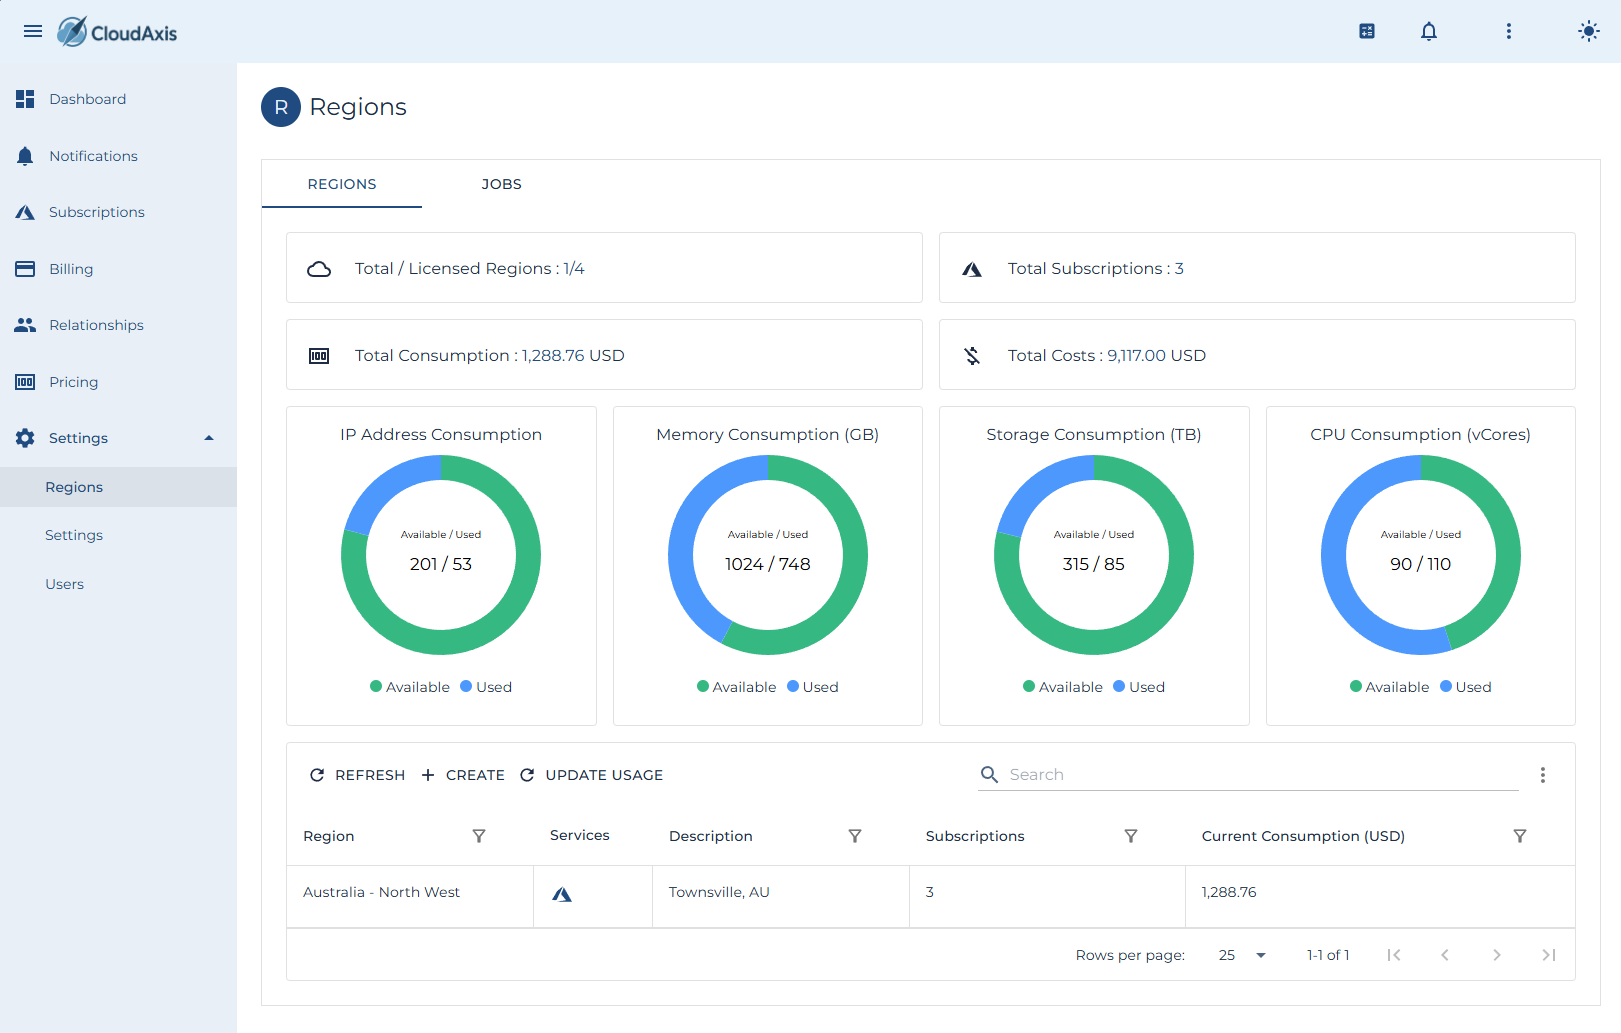
Region Management
Introduction
This page covers day-to-day region administration.
Add a Region
Purpose
Register a new region so usage can be collected and processed.
Permission Level
Platform Administrator
Steps
-
Go to Administration → Regions.
-
Select Create.
-
Enter Region Name and details.
-
Provide required endpoints and credentials.
-
Set default time zone and collection window.
-
Select Save.
Edit a Region
Purpose
Update credentials, endpoints, or metadata for an existing region.
Permission Level
Platform Administrator
Steps
-
Go to Administration → Regions.
-
Select the region you want to edit.
-
Update Region Name, credentials, endpoints, or time zone as required.
-
Select Save.
Start Usage Processing
Purpose
Manually trigger usage processing for a region.
Permission Level
Platform Administrator
Steps
-
Go to Administration → Regions.
-
Select the region you want to process.
-
Select Update Usage
-
Choose the date range (start and end).
-
Confirm and monitor the job status.
Remove a Region
Purpose
Delete a region that is no longer in use.
Permission Level
Platform Administrator
Steps
-
Go to Administration → Regions.
-
Select the region you want to delete.
-
Select Delete.
-
Confirm the deletion.
Check Region Health
Purpose
View the health and last run status of a region.
Permission Level
Platform Administrator
Steps
-
Go to Administration → Regions.
-
Open the Health or Status panel for the region.
-
Review last run time, errors, and next scheduled run.
-
Drill into failed jobs if needed.
User Management
Introduction
This page covers day-to-day user administration across the commercial hierarchy (platform, distributor, partner, tenant). It includes adding, editing, disabling, deleting users, assigning roles and scopes, and handling password/MFA resets.
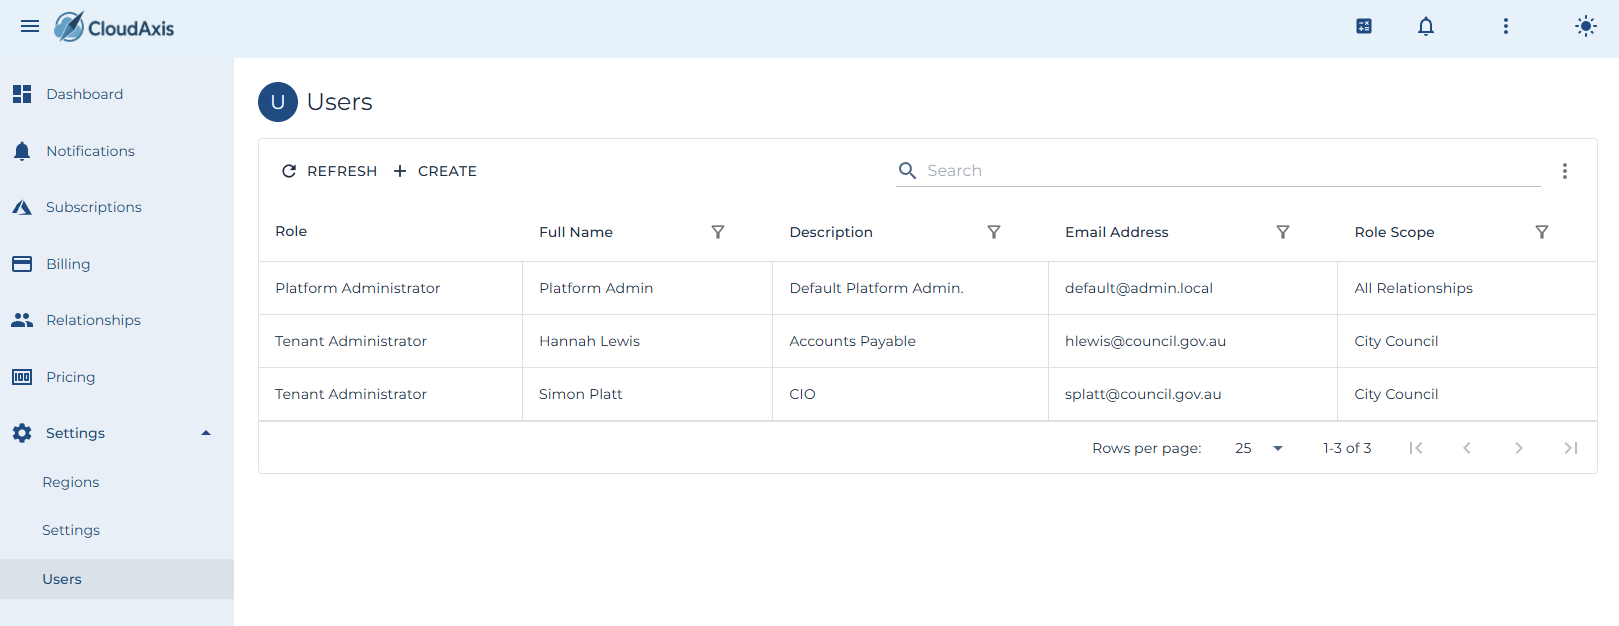
Add a new User
Purpose
Add a new user to the system.
Permission Level
- Platform Administrator
- Partner Administrator
- Distributor Administrator
- Tenant Administrator
Steps
- Go to Settings→ Users.
- Select Create.
- Enter First Name, Last Name, Email Address, and optionally Phone Number.
- Select User Role. Select Distributor, Partner, and Tenant to define the user’s scope.
- (Optional) Toggle MFA Required if your policy requires MFA at next sign-in.
- (Optional) Toggle Federated Only to prevent local password login for this user.
- Save.
Modify an existing User
Purpose
Modify an existing user’s details, role, scope, or security options.
Permission Level
- Platform Administrator
- Partner Administrator
- Distributor Administrator
- Tenant Administrator
Steps
- Go to Settings → Users.
- Select the user you want to edit.
- Update First Name, Last Name, Email Address, or Phone Number if required.
- Adjust User Role.
- Update Distributor, Partner, and Tenant scope as needed.
- Adjust toggles: MFA Required, Federated Only, Disabled, or Locked Out.
- Select Save.
Disable or Enable a User
Purpose
Temporarily block or restore user access without deleting the account.
Permission Level
- Platform Administrator
- Partner Administrator
- Distributor Administrator
- Tenant Administrator
Steps
- Go to Settings → Users.
- Select the user you want to edit.
- Toggle Disabled on to suspend, off to re-enable.
- Select Save.
Unlock a User
Purpose
Clear a lockout after failed login attempts.
Permission Level
Platform Administrator
Distributor Administrator
Partner Administrator
Tenant Administrator
Steps
-
Go to Settings → Users.
-
Select the user you want to edit.
-
Unset the Locked Out indicator.
-
Select Save.
Enforce MFA
Purpose
Require the user to register or re-register MFA at next sign-in.
Permission Level
Platform Administrator
Distributor Administrator
Partner Administrator
Tenant Administrator
Steps
-
Go to Settings → Users.
-
Select the user you want to edit.
-
Toggle MFA Required on.
-
Select Save.
Force Federated Only
Purpose
Restrict the account to federated sign-in only (no local password).
Permission Level
Platform Administrator
Distributor Administrator
Partner Administrator
Tenant Administrator
Steps
-
Go to Settings → Users.
-
Select the user you want to edit.
-
Toggle Federated Only on.
-
Select Save.
Delete a User
Purpose
Remove a user account permanently.
Permission Level
Platform Administrator
Distributor Administrator
Partner Administrator
Tenant Administrator
Steps
-
Go to Settings → Users.
-
Select the user you want to delete.
-
Choose Delete.
-
Confirm the deletion.
Subscription Management
Introduction
This page covers creating, managing and removing subscriptions in the system.
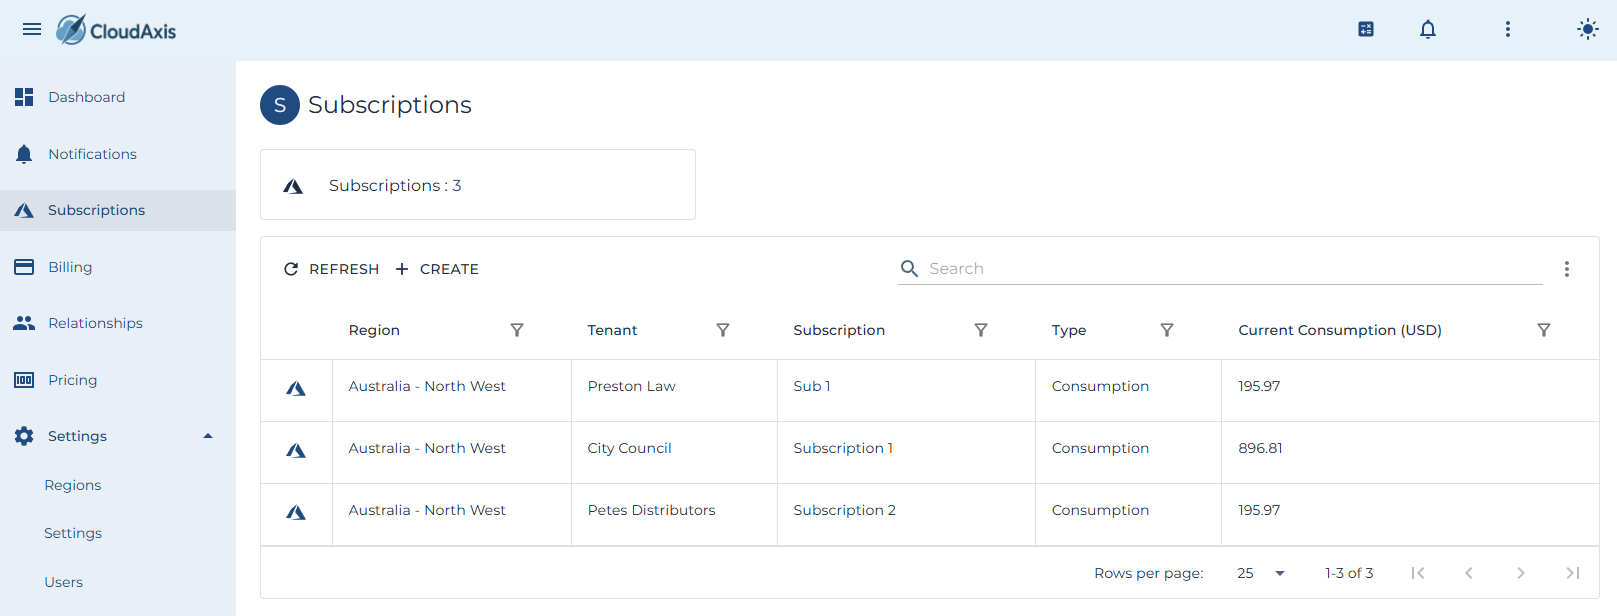
Add a Subscription
Purpose
Create a new subscription for a tenant.
Permission Level
Partner Administrator
Distributor Administrator
Platform Administrator
Steps
-
Go to Administration → Subscriptions.
-
Select Create.
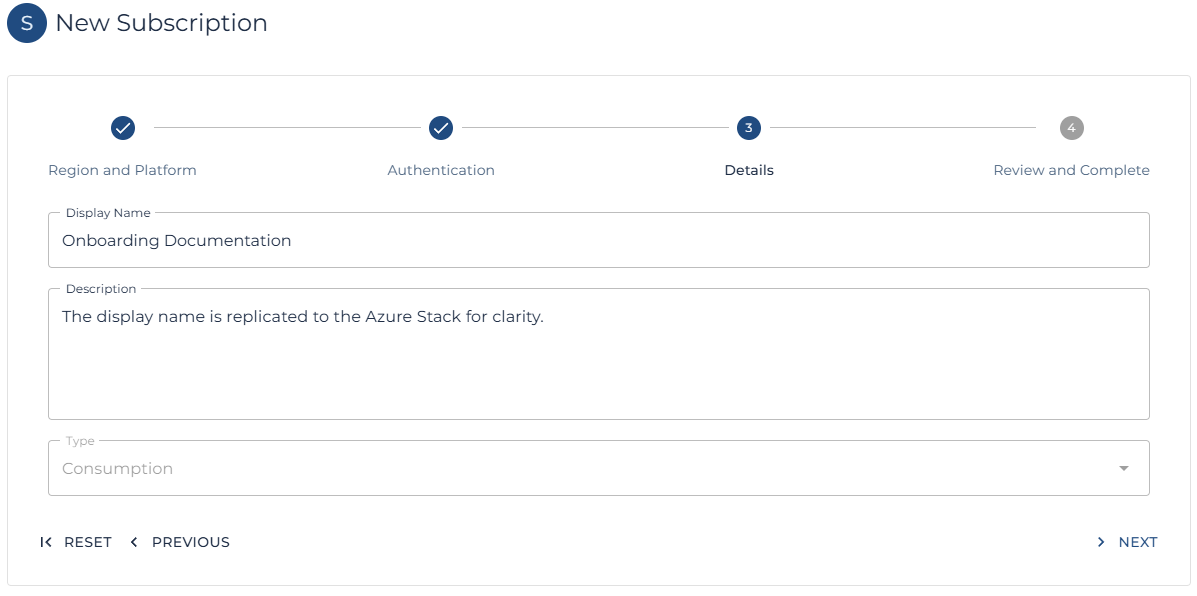
-
Enter Subscription Name.
-
Select the tenant required.
-
Enter in the Entra tenant and initial owner information.
-
Select Save.
Edit a Subscription
Purpose
Update subscription detail.
Permission Level
Partner Administrator
Distributor Administrator
Platform Administrator
Steps
-
Go to Administration → Subscriptions.
-
Select the subscription you want to edit.
-
Update as required.
-
Select Save.
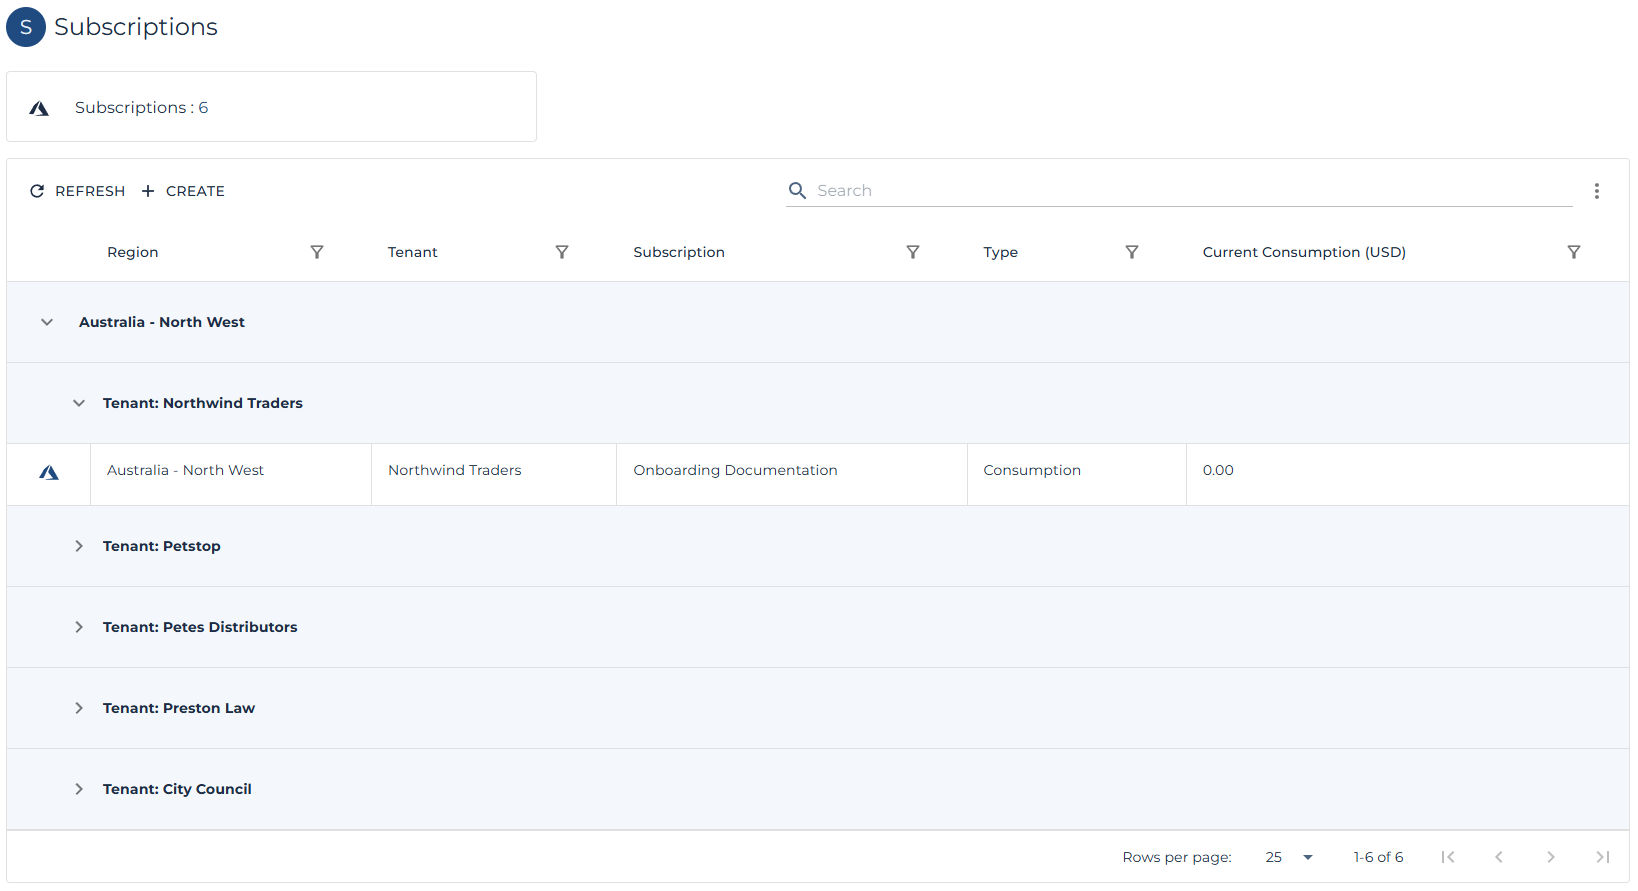
View Subscription Details
Purpose
See subscription usage, billing, and configuration.
Permission Level
Partner Administrator
Distributor Administrator
Platform Administrator
Tenant Administrator (limited to own subscriptions)
Steps
-
Go to Administration → Subscriptions.
-
Select the subscription to open its details.
-
Review usage metrics, plan assignments, and status.
Update Usage (Manual)
Purpose
Trigger a manual usage update for a subscription.
Permission Level
Partner Administrator
Distributor Administrator
Platform Administrator
Steps
-
Go to Administration → Subscriptions.
-
Select the subscription you want to update.
-
Choose Update Usage.
-
Enter date range if prompted.
-
Confirm.
View Subscription Summary
Purpose
Generate a usage and billing summary for reporting or reconciliation.
Permission Level
Partner Administrator
Distributor Administrator
Platform Administrator
Steps
-
Go to Administration → Subscriptions.
-
Select Summary.
-
Enter filters (tenant, date range).
-
Run summary.
-
Review usage totals and billing results.
Delete a Subscription
Purpose
Remove a subscription that is no longer required.
Permission Level
Partner Administrator
Distributor Administrator
Platform Administrator
Steps
-
Go to Administration → Subscriptions.
-
Select the subscription you want to delete.
-
Select Delete.
-
Confirm deletion.
System Settings
Introduction
Configure global CMS behavior, including provisioning rules, billing defaults, invoice appearance, calculators, and health checks.
Permission Level
Platform Administrator
Tenant Settings
-
Partner Self Provisioning — Allow partners to create their own tenants. (Switch)
-
Distributor Self Provisioning — Allow distributors to create their own tenants. (Switch)
-
Default Tenant Currency — Set the default currency for new tenants, partners, and distributors. (Currency List)
Steps
-
Go to Administration → System Settings → Tenants.
-
Toggle or select values as needed.
-
Select Save.
Subscription Settings
-
Tenant Self Provisioning — Allow tenants to create their own subscriptions. (Switch)
-
Partner Provisioning — Allow partners to provision subscriptions for their tenants. (Switch)
-
Distributor Provisioning — Allow distributors to provision subscriptions for their tenants. (Switch)
-
Auto Created Subscription Tenant Id — Default tenant for subscriptions created automatically from platform subscriptions. (Tenant List)
-
Perform Tenant Identity Health Checks — Enable tenant identity health checks. (Switch)
-
Auto Create Missing Subscriptions — Automatically create CMS subscriptions from detected platform subscriptions. (Switch)
Steps
-
Go to Administration → System Settings → Subscriptions.
-
Adjust values.
-
Select Save.
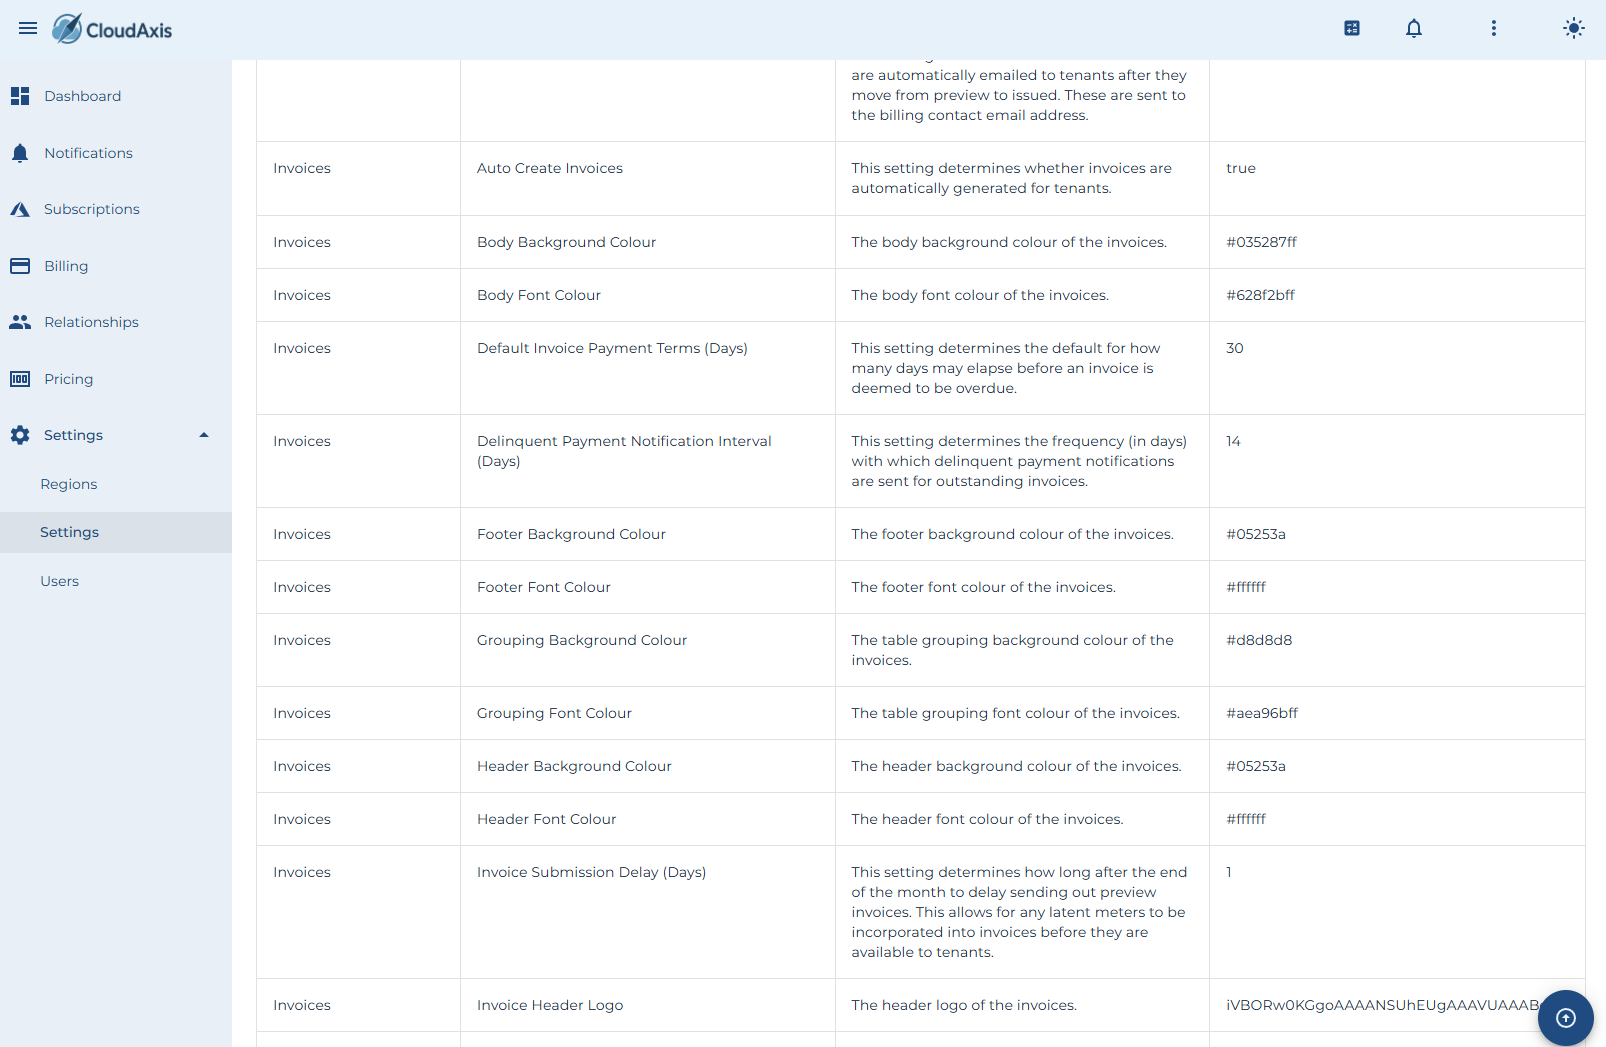
Invoice Settings
-
Invoice Submission Delay (Days) — Delay sending preview invoices after month end. (Number Box)
-
Header Background Colour — Set invoice header background color. (Colour Picker)
-
Body Background Colour — Set invoice body background color. (Colour Picker)
-
Footer Background Colour — Set invoice footer background color. (Colour Picker)
-
Header Font Colour — Set header text color. (Colour Picker)
-
Body Font Colour — Set body text color. (Colour Picker)
-
Footer Font Colour — Set footer text color. (Colour Picker)
-
Grouping Background Colour — Set table grouping background color. (Colour Picker)
-
Grouping Font Colour — Set table grouping font color. (Colour Picker)
-
Invoice Header Logo — Upload logo for invoice header. (File Picker)
-
Invoice Payment Details — Configure invoice footer payment details. (Text Box)
-
Auto Create Invoices — Enable automatic invoice generation. (Switch)
-
Auto Email Invoices — Enable automatic emailing of issued invoices. (Switch)
-
Delinquent Payment Notification Interval (Days) — Frequency for sending delinquent notifications. (Number Box)
-
Send Delinquent Payment Notifications — Enable sending of delinquent notifications. (Switch)
-
Store Invoices In Azure Storage — Upload invoices to Azure Stack storage account. (Switch)
-
Default Invoice Payment Terms (Days) — Default overdue period. (Number Box)
Steps
-
Go to Administration → System Settings → Invoices.
-
Adjust visual, timing, and delivery settings.
-
Select Save.
User Settings
-
Tenant Self Provisioning — Allow tenants to create their own users. (Switch)
-
Partner Self Provisioning — Allow partners to create their own users. (Switch)
-
Distributor Self Provisioning — Allow distributors to create their own users. (Switch)
-
Require User Activation — Require users to activate their accounts before login. (Switch)
-
Require User Activation Code — Require activation code at first login. (Switch)
Steps
-
Go to Administration → System Settings → Users.
-
Adjust toggles.
-
Select Save.
Billing Settings
-
Default Platform Currency — Base currency for the platform. (Currency List)
-
Use Monthly Variable Pricing — Apply variable pricing based on hours in the month. (Switch)
Steps
-
Go to Administration → System Settings → Billing.
-
Adjust defaults.
-
Select Save.
Calculator Settings
-
Show To Tenants — Show the calculator to tenants. (Switch)
-
Show To Partners — Show the calculator to partners. (Switch)
-
Show To Distributors — Show the calculator to distributors. (Switch)
Steps
-
Go to Administration → System Settings → Calculator.
-
Adjust visibility.
-
Select Save.
Platform Settings
-
Report Platform Alerts — Generate CMS alerts for platform-specific health events. (Switch)
Steps
-
Go to Administration → System Settings → Platforms.
-
Toggle settings.
-
Select Save.
Job Settings
-
Job Maximum Runtime (Hours) — Maximum runtime before a job is marked as failed. (Number Box)
Steps
-
Go to Administration → System Settings → Jobs.
-
Adjust the maximum runtime.
-
Select Save.
Price Management
Introduction
Manage all pricing constructs for the CMS. Pricing is scoped either at the Region or Tenant level. Features include SKU and meter pricing, credits, tiered thresholds, cloning price lists, applying modeled price increases, and estimating impact.
Permission Level
Platform Administrator
Create or Edit a Price List
Purpose
Define rates for a region or tenant.
Steps
-
Go to Pricing.
-
Choose Region or Tenant scope.
-
Enter a Display Name and Description.
-
Add Pricing Items:
-
Meter / SKU — Select from available meters.
-
Rate — Enter base rate.
-
(Optional) Credits — Enter credits to offset usage.
-
(Optional) Tiered Thresholds — Define usage ranges with rates.
-
-
Save.
Clone a Price List
Purpose
Quickly create a new list by copying an existing one.
Steps
-
Go to Administration → Pricing.
-
Select the price list to clone.
-
Choose Clone Price List.
-
Select target scope (Region or Tenant).
-
Update details as required.
-
Save.
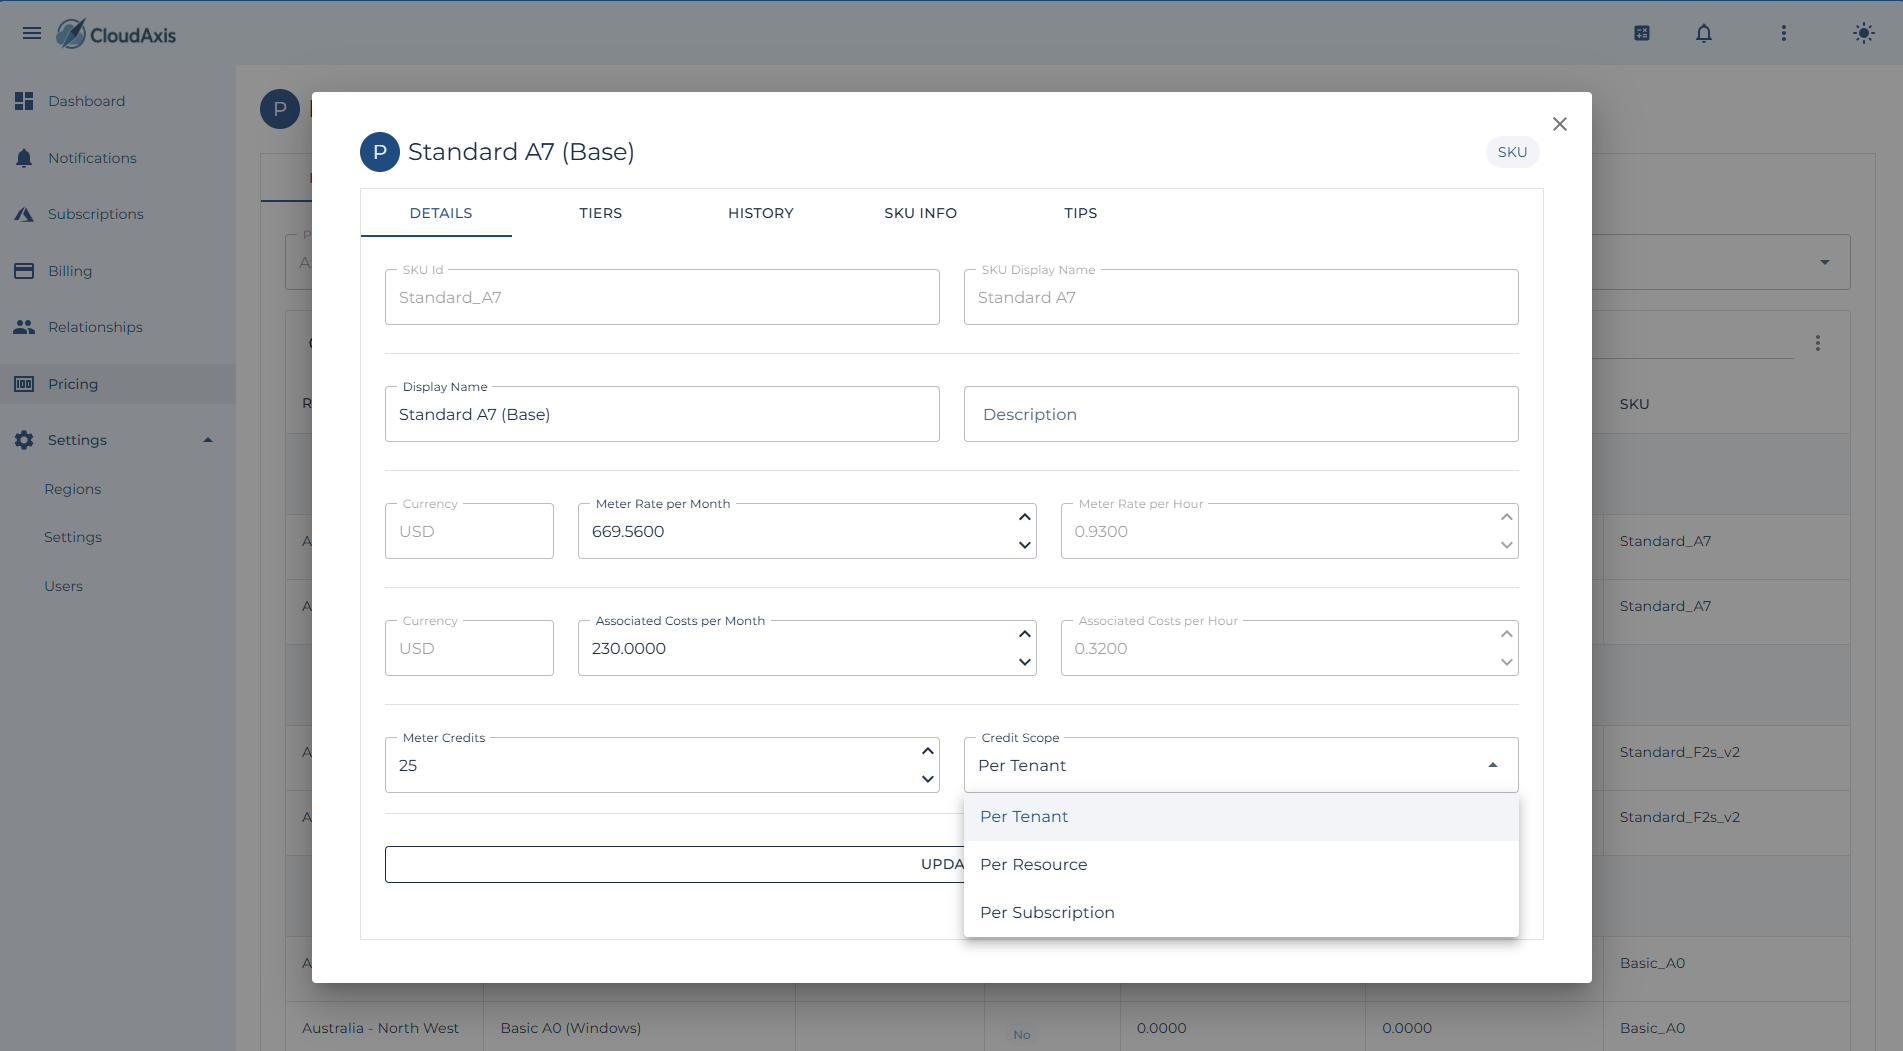
Add or Edit Meter and SKU Pricing
Purpose
Set or adjust prices for specific meters and SKUs.
Steps
-
Open a Price List.
-
Select Add Meter/SKU.
-
Choose the desired Meter.
-
Enter Rate, Unit, and Description.
-
(Optional) Apply Credits or Tiered Thresholds.
-
Save.
Configure Credits
Purpose
Offset costs for specific meters, subscriptions, or tenants.
Steps
-
Open a Price List.
-
Select a Meter or SKU.
-
Enter Credit amount.
-
Save.
Configure Tiered Pricing
Purpose
Apply progressive rates based on usage ranges.
Steps
-
Open a Price List.
-
Select a Meter or SKU.
-
Add Tiered Threshold.
-
Enter From Quantity, To Quantity, and Rate.
-
Save.
Apply Price Increases (with Modeling)
Purpose
Increase pricing by percentage or fixed amount and preview the impact before applying.
Steps
-
Go to Administration → Pricing Tools → Price Increase.
-
Choose Scope (Region or Tenant).
-
Select Increase Type: Percentage or Fixed Amount.
-
Enter Increase Amount.
-
Run Model to preview impacts across meters and tenants.
-
Review modeled results.
-
Apply changes to generate updated Price List.
Estimate Costs (Estimator Tool)
Purpose
Model tenant or subscription costs using current or proposed pricing.
Steps
-
Go to Administration → Pricing Tools → Estimator.
-
Select Tenant or Subscription.
-
Choose a Price List.
-
Enter estimated usage quantities.
-
Run Estimate.
-
Review projected cost breakdown.
Delete a Price List
Purpose
Remove an obsolete price list.
Steps
-
Go to Administration → Pricing.
-
Select the price list.
-
Choose Delete.
-
Confirm.
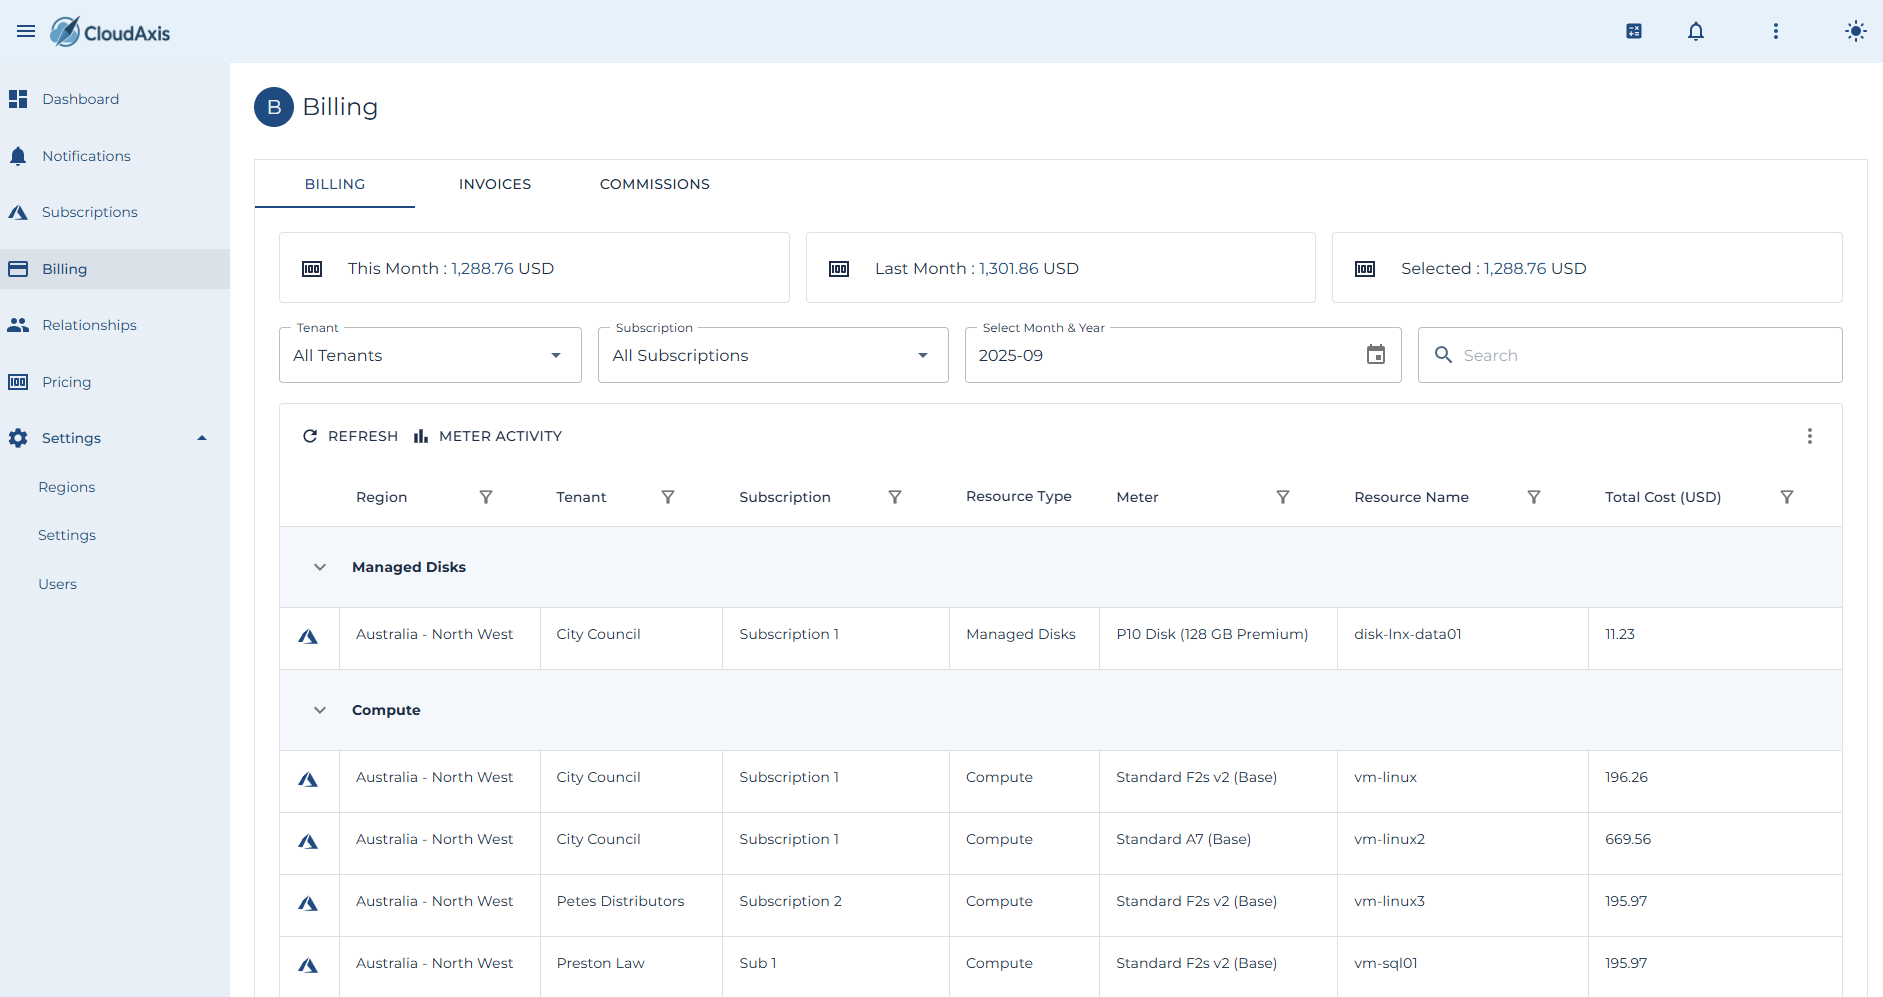
Billing Management
Purpose
Manage invoicing and commission processing in the CMS.
Invoices capture tenant consumption and apply pricing rules.
Commissions remunerate partners and distributors based on consumption.
Permission Level
Platform Administrator
Distributor Administrator (limited to own scope)
Partner Administrator (limited to own scope)
Generate Invoices
Purpose
Create invoices for a billing period.
Steps
-
Go to Administration → Billing → Invoices.
-
Select Generate.
-
Choose Billing Period (e.g. month).
-
Select Tenant(s) or run for all.
-
Confirm generation.
View Invoice
Purpose
Review invoice details before issuing to tenants.
Steps
-
Go to Administration → Billing → Invoices.
-
Select the invoice.
-
Review consumption, pricing, discounts, and totals.
-
Verify currency and payment terms.
Issue Invoice
Purpose
Move invoice from preview to issued.
Steps
-
Go to Administration → Billing → Invoices.
-
Open the preview invoice.
-
Select Issue.
-
Confirm.
Email Invoice
Purpose
Send an issued invoice to tenant billing contacts.
Steps
-
Go to Administration → Billing → Invoices.
-
Select the invoice.
-
Choose Email Invoice.
-
Confirm.
Store Invoice in Azure Stack
Purpose
Upload invoices to configured Azure Stack storage.
Steps
-
Ensure “Store Invoices in Azure Storage” is enabled under System Settings → Invoices.
-
Generate or Issue an invoice.
-
Verify invoice appears in the storage account.
Delete an Invoice
Purpose
Remove an invoice (typically in preview status).
Steps
-
Go to Administration → Billing → Invoices.
-
Select the invoice.
-
Choose Delete.
-
Confirm.
Commission Management
Purpose
Calculate and review commissions for partners and distributors.
Configure Commission Rates
Purpose
Set commission tiers based on consumption.
Steps
-
Go to Administration → Billing → Commissions → Rates.
-
Select Distributor or Partner.
-
Add one or more Tiers: From Amount, To Amount, Percentage.
-
Save.
Generate Commission Summary
Purpose
Produce commission calculations for a billing period.
Steps
-
Go to Administration → Billing → Commissions.
-
Select Generate Summary.
-
Choose Period (month or year).
-
Confirm.
View Commission Summary
Purpose
Review commission results for a distributor or partner.
Steps
-
Go to Administration → Billing → Commissions.
-
Select the entity.
-
Review calculated totals and tier application.
Export Commission Data
Purpose
Download commission summaries for financial reporting.
Steps
-
Go to Administration → Billing → Commissions.
-
Select Export.
-
Choose format (CSV, Excel, etc.).
-
Confirm.
Container Management
Introduction
This section will outline the steps necessary to patch and maintain the CMS software delivered as containers.
Patch Docker Host
Purpose
Deploy the latest updated to the Docker host itself.
Permission Level
Docker Host Administrator
Notes
- You will likely need to enable the firewall ruleset that allows SSH access into the Docker host.
- If necessary, execute docker logs [container name].
Steps
- Connect via SSH to the host.
- Execute sudo apt update
- Execute apt list --upgradable
- Execute sudo apt upgrade -y
- Execute cd /mnt/cms
- Execute docker ps -a
Update Containers
Purpose
Update all containers in the CMS service to the latest version.
Permission Level
Docker Host Administrator
Notes
- You will likely need to enable the firewall ruleset that allows SSH access into the Docker host.
Steps
- Connect via SSH to the host.
- Execute cd /mnt/cms
- Execute docker compose down
- Execute docker compose pull
- Execute docker compose up -d
- Execute docker ps -a
- Execute docker system prune -a
Knowledge Base
A set of common issues and solutions
Networking Stack
Idle Time-Outs
Issue Overview
In some instances, the default time out for the Signal-R portal circuit may require increasing. This issue is caused by the default time out windows imposed by the Nginx reverse proxy.
Symptoms
- You routinely find the application shows "Attempting to connect to the server" without being idle for a reasonable period of time.
- You find the portal "flashes" a lot while working.
Solution
1. Connect to the Docker host.
2. Modify the Nginx configuration and add the following.
location / {
    proxy_pass http://cms_portal:8080;
    proxy_http_version 1.1;
    proxy_set_header Upgrade $http_upgrade;
    proxy_set_header Connection "upgrade";
    proxy_set_header Host $host;

    # Important for SignalR long-lived connections:
    proxy_read_timeout 3600s;
    proxy_send_timeout 3600s;
}
3. When complete. Restart the Nginx container.
docker compose exec nginx nginx -t && docker compose exec nginx nginx -s reload